We earn a commission from partner links on this site. This doesn’t affect our opinions or evaluations.
Creating a membership site on Podia offers tremendous value, though navigating the numerous components can feel daunting at first glance.
This comprehensive walkthrough serves as your perfect starting point if you’re drawn to Podia’s platform but feel uncertain about the initial steps to take.
Throughout this resource, we’ll thoroughly explore Podia’s robust membership capabilities and provide detailed instructions for building your community from the ground up.
Before diving into the process, let’s examine the standout attributes that make Podia particularly well-suited for hosting membership communities.
Podia empowers you to launch and monetize an extensive variety of digital content. Specifically, as a content creator, your portfolio can include:
Podia truly distinguishes itself as a premier membership hosting platform through its seamlessly integrated community functionality.
Creating an interactive community space enables meaningful conversations among your members, provides timely support when questions arise, and ultimately fosters lasting relationships between your brand and audience.
Beyond facilitating discussions, this powerful community feature serves as an ideal channel for delivering premium monthly content exclusively to your membership base.
Podia particularly excels in the membership space through its highly customizable revenue models.
The platform allows you to structure payments on either monthly or annual cycles. Additionally, you can implement complimentary trial periods to showcase your membership value before commitment.
One standout advantage of Podia’s payment framework is the straightforward process to establish diverse membership levels. You maintain complete freedom to develop numerous membership plans and carefully curate which products appear in each tier.
Robust Promotion Capabilities
Podia equips you with a comprehensive collection of promotional resources designed specifically for expanding your membership community reach.
These valuable tools include:
Each tool offers distinct strategic advantages for your business growth. For instance, leveraging the affiliate marketing functionality enables you to establish a network of partners who actively promote your offerings in return for commission-based incentives.
We’ve highlighted these standout Podia capabilities as particular favorites. For a more comprehensive platform evaluation, explore our thorough Podia platform assessment.
Now, let’s walk through the practical implementation of your Podia membership community.
Your initial task when building a membership website involves establishing your community foundation. Within Podia, this community space serves as the essential cornerstone of your entire membership operation.
This versatile environment enables interactive discussions and scheduled content delivery, while also functioning as the connection point for your various membership subscription options.
To begin this process, navigate to your administrative control center. Current subscribers simply need to access their existing account. New users should first register for a complimentary trial period.
To generate your community space, locate and select the Community option from the primary navigation menu within your administrative dashboard.

Podia automatically generates a community framework for immediate use. Your responsibility involves configuring the appropriate settings and determining access permissions and visibility options. Access these controls by selecting Settings from within the community section.
Begin by inputting fundamental community information, including a distinctive name, compelling description, and representative brand imagery. Additionally, you have the option to enhance your community’s appearance with a custom banner and establish default discussion categories that will be accessible to all community participants.

Following your initial configuration, you’ll want to establish discussion categories. Podia enables you to develop specialized topics that both maintain organizational structure within your community and provide opportunities for exclusive member subgroups.
To generate a fresh discussion category within your community environment, navigate to All topics in the community navigation panel and then click the + New Topic button.
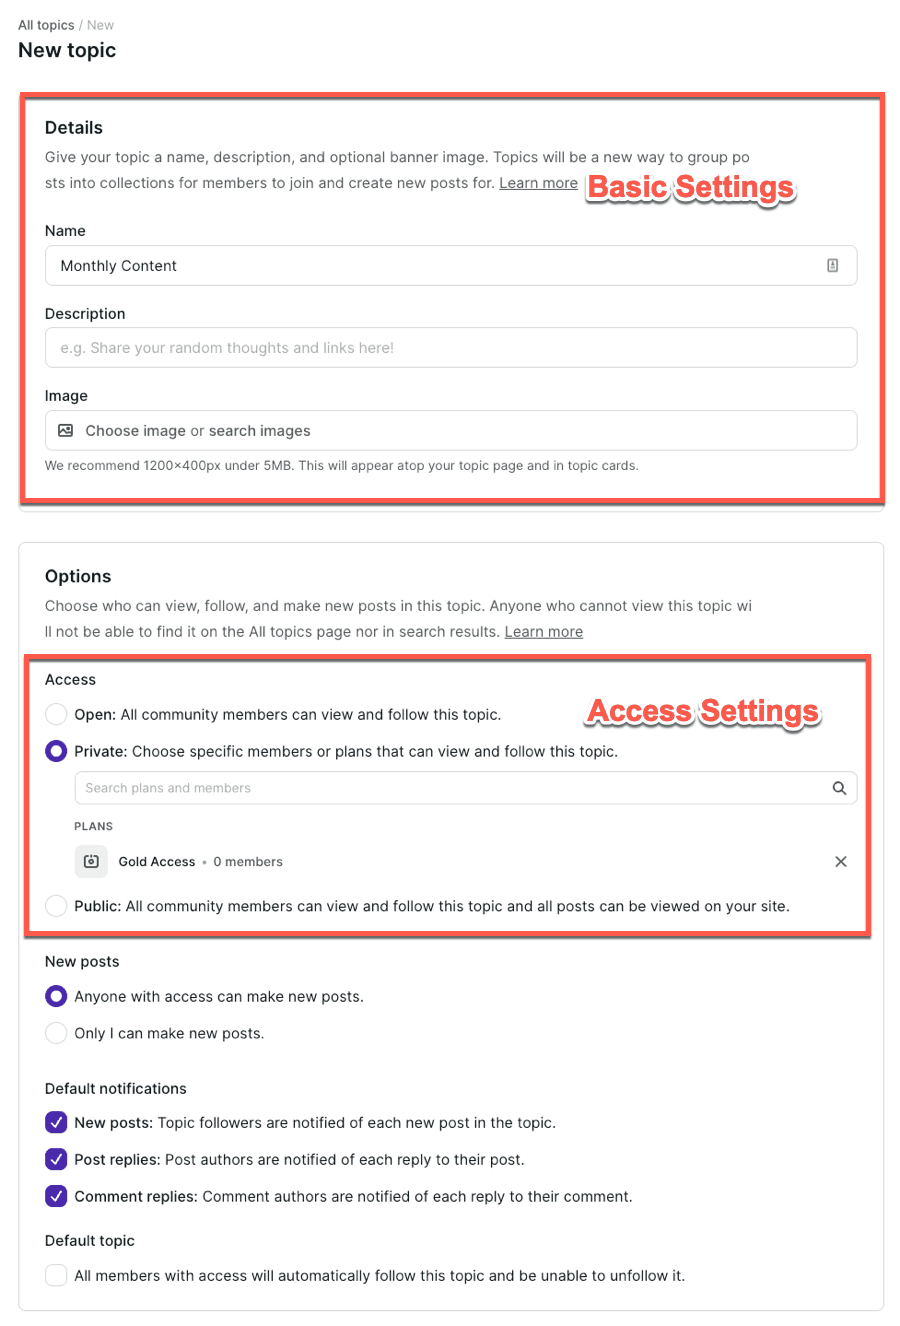
Next, assign your topic a descriptive title and concise explanation, then select an appropriate visual representation. After completing these basic details, you’ll need to determine the appropriate access restrictions.
For topics intended for all membership levels, simply designate it as Open. Alternatively, for restricted content, select the Private option and specify which membership tiers should receive access privileges.
As an illustration, if you provide coaching sessions exclusively to premium-tier members, you might create a dedicated topic labeled Coaching Calls with access permissions limited to that specific membership level.
You have the flexibility to automatically enroll all members in specific topics or allow individuals to manage their own topic subscriptions according to their preferences.
We strongly advise establishing a dedicated topic specifically for organizing your recurring monthly content releases. This approach creates an efficient central repository for all ongoing materials. You might even consider developing multiple topics organized around specific thematic elements.
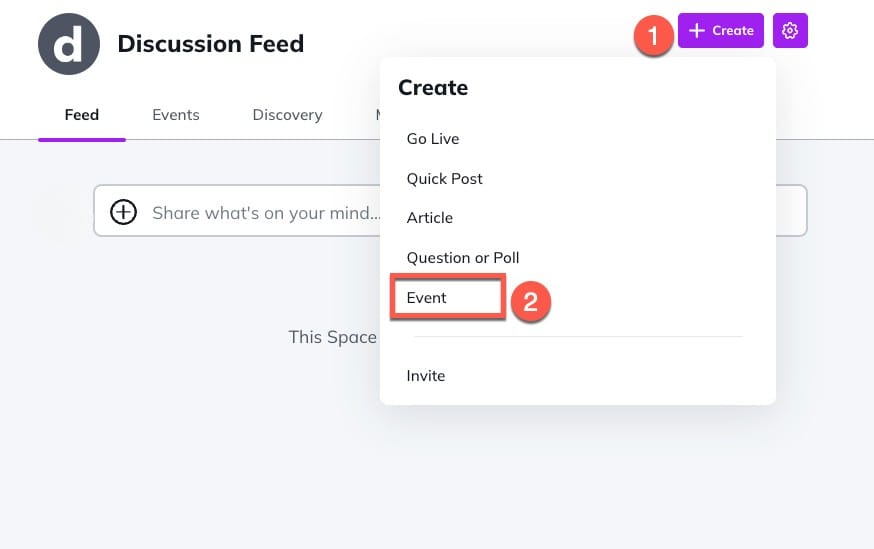
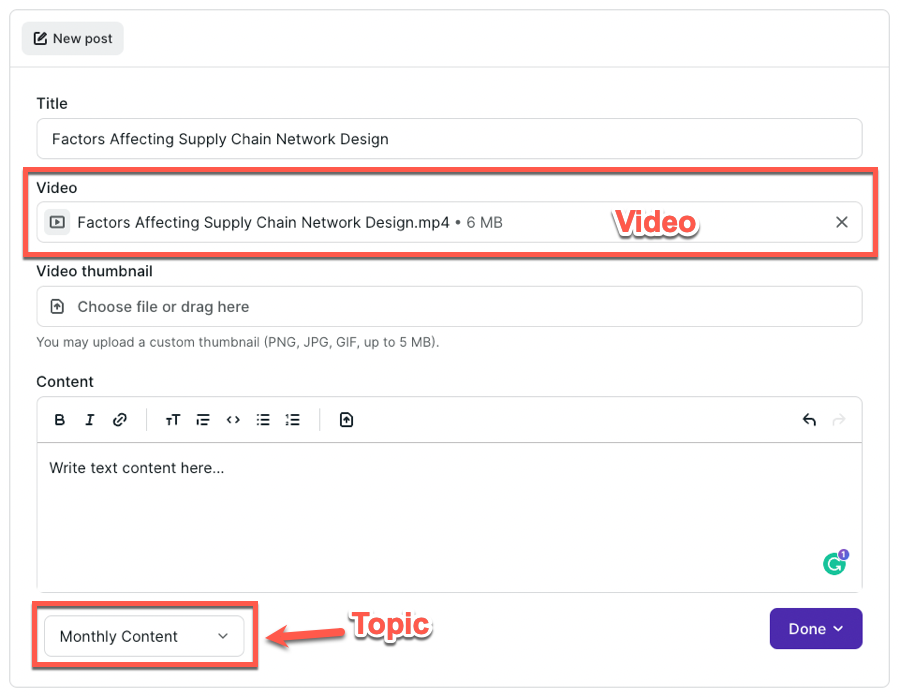
To publish fresh content, select the New Post button displayed on your community’s main page, compose your message, assign it to the appropriate category, and then finalize by publishing your contribution.
A particularly valuable aspect of Podia’s community functionality is its versatility beyond simple text updates – the platform supports video content uploads, making it exceptionally well-suited for delivering consistent, engaging membership materials over time.
Additionally, your community environment features a comprehensive participant registry, enabling you to view all community members, utilize search functionality to locate specific individuals, and initiate private conversations through direct messaging.
Once you’ve personalized these various configuration options, your Podia community will be fully prepared to welcome new participants. At this stage, you can proceed to develop supplementary products to incorporate within your membership offering.
As we highlighted earlier, Podia accommodates numerous product formats, allowing you to craft diverse resources as components of your membership package.
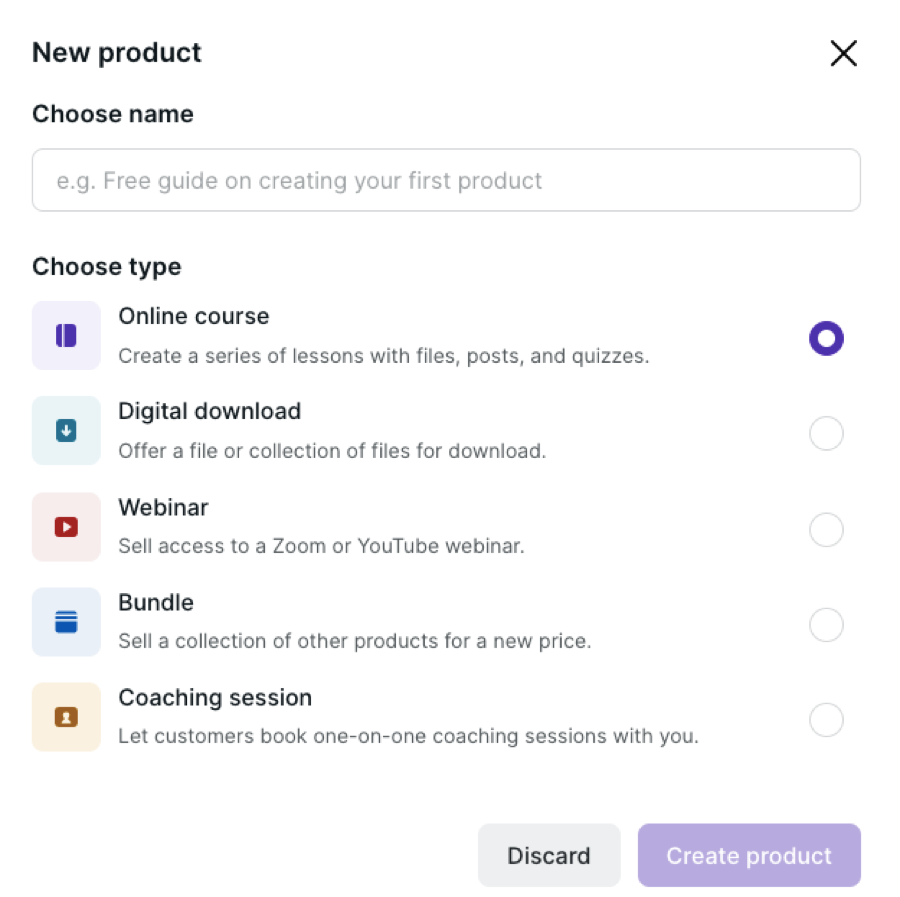
To generate a new offering, navigate to your administrative dashboard, select Products from the menu, and click the + New Product button located in the upper right section of your screen.
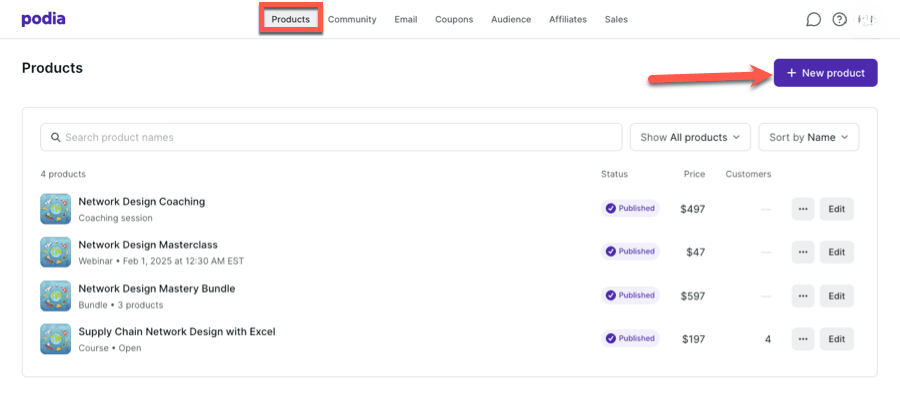
Following this action, Podia will prompt you to assign a title to your offering and select from the available product categories. At this stage, you can establish an online learning program, downloadable resource, live webinar event, or personalized coaching session.
For illustration purposes, we’ll proceed with creating an Online Course, as this represents the most frequently utilized product category within membership environments.

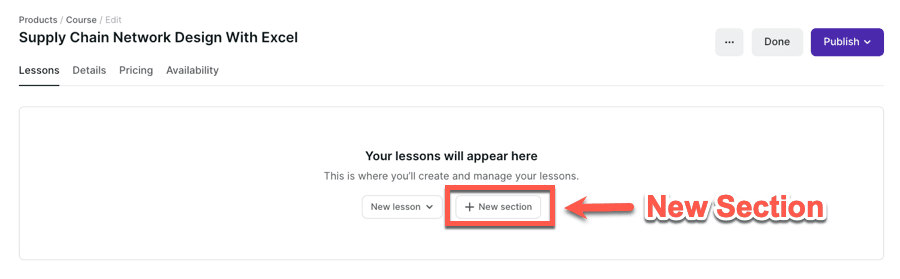
Subsequently, you can populate your section with individual lessons. Podia offers versatility through several supported lesson formats, including video presentations, text-based content, interactive quizzes, and embedded materials.
When incorporating video instruction, simply choose Add files and upload your prepared video content. This straightforward process immediately prepares your video lesson for student access.

Continue repeating these development steps until you’ve constructed your entire educational framework.
While we’ve utilized the online course scenario to illustrate Podia’s product creation workflow, you can apply comparable procedures when developing other product varieties.
After completing this development phase, you’ll proceed to establish your membership pricing structure and incorporate access to these newly created offerings.
Within Podia’s structure, membership pricing remains directly connected to your community framework. The platform supports multiple subscription tiers, each with customizable product inclusions.
To establish a new subscription option, return to your community area and select Settings. Then navigate to the bottom portion of the configuration screen.
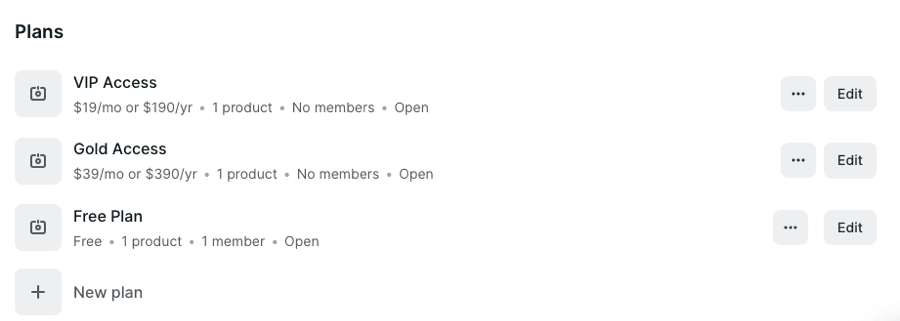
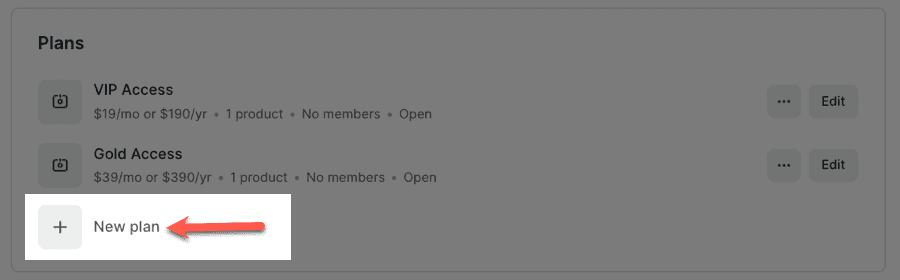
This section displays any previously created subscription options if they exist. If you haven’t created any tiers yet, you’ll simply see the + New Plan button. Click this button to initiate the creation of a fresh membership level.
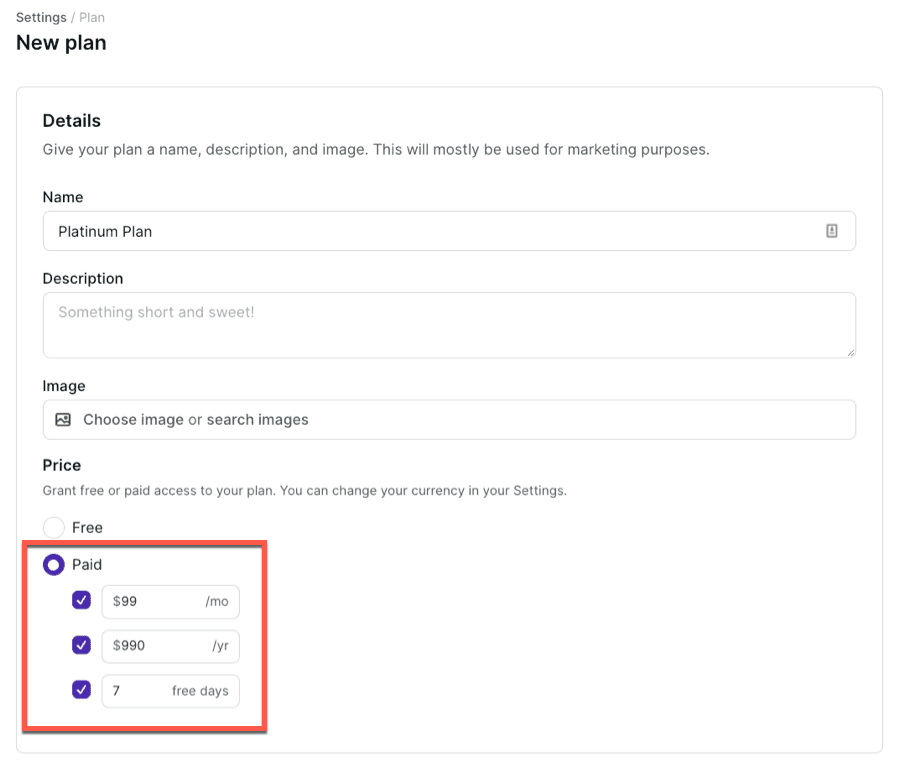
The interface will present fields allowing you to assign a distinctive title to your membership tier, craft a concise description explaining its value, and upload a representative visual element.
Following these basic details, you’ll configure the financial aspects. Podia enables you to implement both monthly and annual payment structures, along with the flexibility to offer complimentary access periods of any duration you determine appropriate.

Subsequently, you can determine the plan’s market status. You might choose to make it readily purchasable through your website and embedded checkout options, or alternatively, you could temporarily or permanently restrict its availability.
As previously highlighted, Podia supports the creation of multiple membership levels. Should you wish to establish additional subscription options, simply return to your community configuration panel and duplicate this development sequence.
After finalizing your membership structure to your satisfaction, you can transition to designing an effective sales page for your membership offerings.
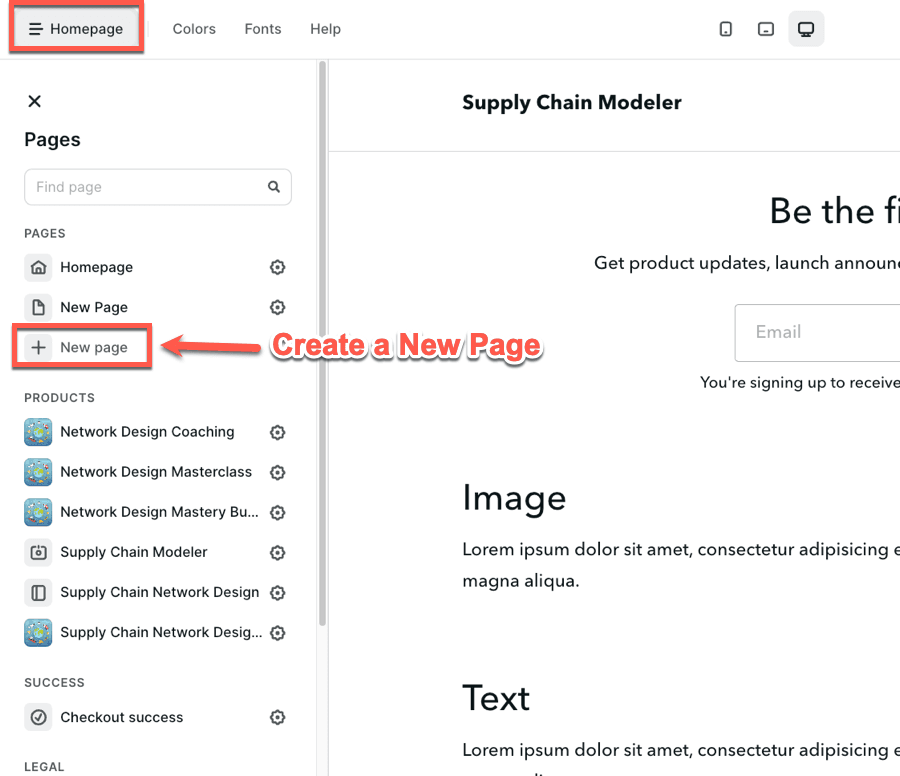
The final phase in establishing your Podia membership platform involves developing a compelling promotional page. This crucial marketing asset serves as the information hub where prospective members discover your value proposition and can proceed to the transaction screen to complete their enrollment.
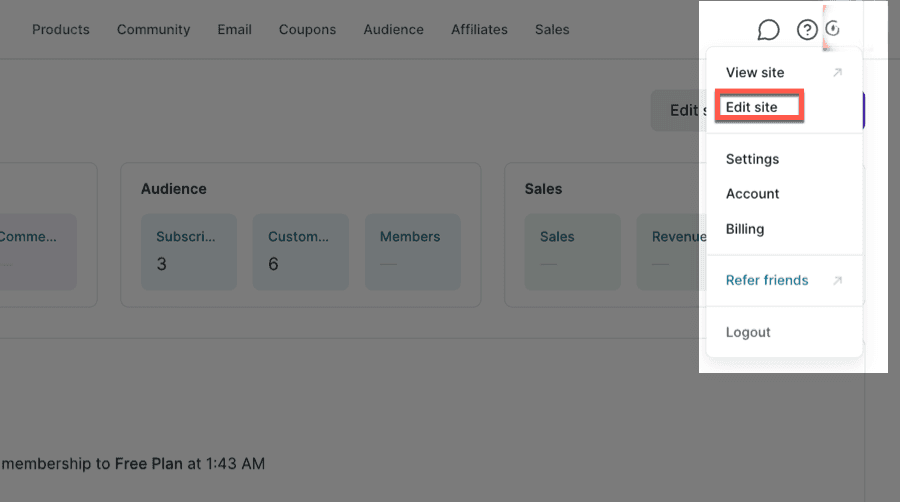
To generate this essential promotional tool, locate and click the user profile icon within your administrative dashboard and select the Edit Site option.
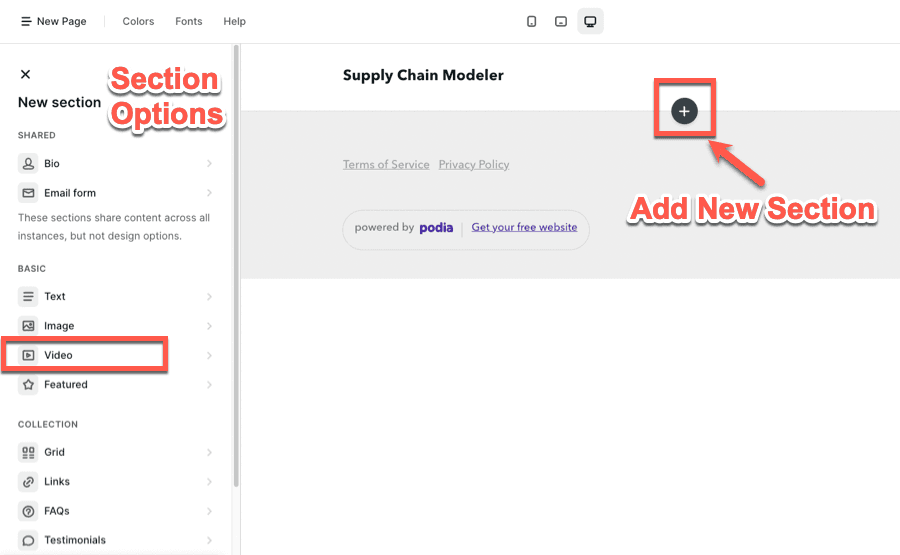
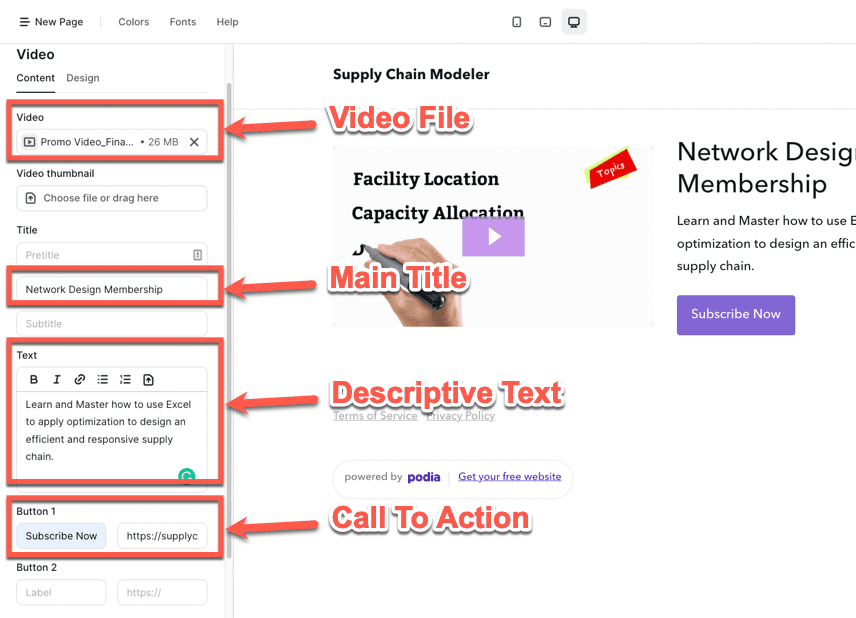
To incorporate a new content segment, select the circular + symbol, which reveals the complete selection of available Podia page components. These modular elements include sections for Text, Image, Video, Features, FAQs, Testimonials, and various other content types.
For demonstration purposes, we’ll walk through creating an engaging video-centered header area with a prominent action prompt. To accomplish this, we’ll implement the Video section component.
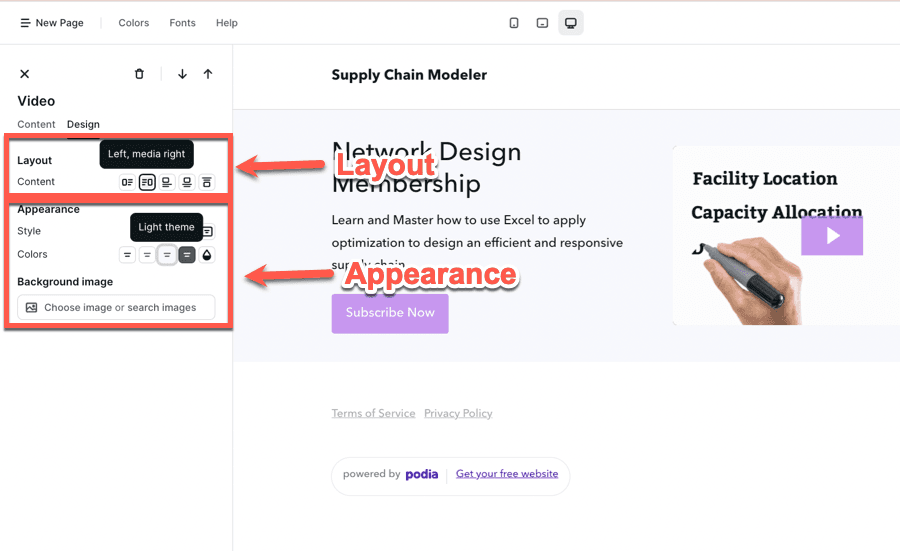
Subsequently, focus on crafting your prominent introductory section’s appearance. Navigate to the Design tab to access these customization controls. This area provides extensive options for modifying both the structural arrangement and visual characteristics of your section.
For instance, select the second layout configuration to position your video content on the right side of the screen. Similarly, if you prefer a brighter aesthetic, choose the Light Theme option for your background coloration. The interface also supports enhancing your design with a custom background image if desired.
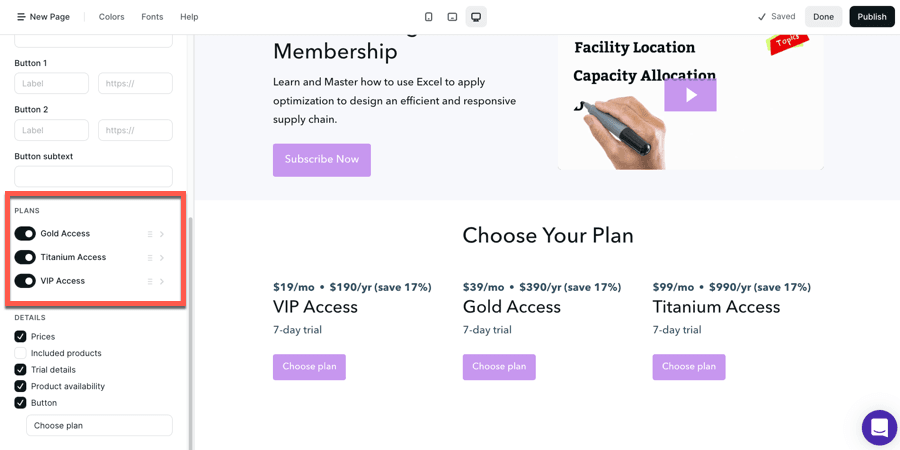
Following your hero section development, let’s incorporate a subscription options display on your promotional page. To accomplish this, activate the + icon once more and select the Plans component from the available options.
This specialized section allows you to showcase either your complete range of membership offerings or a strategic selection of tiers along with their respective details directly within your marketing page.
Similarly, you can modify the structural layout and visual elements of this pricing component by accessing the Design tab options.
This demonstrates the straightforward process for adding and personalizing page components. Podia’s intuitive page construction tool features exceptional user-friendliness, enabling rapid development of professionally designed marketing pages by implementing the procedures outlined above.
Before finalizing, verify your page configuration settings by selecting the gear icon adjacent to your page title. This menu allows you to assign an appropriate name, craft a compelling description, customize the URL structure, and incorporate a representative preview image if desired.
Upon completion of your promotional page development, your membership platform stands ready for public release.
As a final quality assurance measure, we strongly recommend opening a private browsing session to evaluate the complete user experience before widely distributing your offering.
Consider generating a 100% discount code for yourself and proceeding through the entire purchase process as a potential member would experience it. This approach enables you to identify and address any functional issues or improvement opportunities before official launch.
With these preparations complete, you’re positioned to begin promoting your membership community. Simply copy your marketing page address and distribute it to your audience through your website, email communications, or social media channels.
Throughout this comprehensive walkthrough, we’ve explored the complete process for establishing your Podia membership platform – from developing your community foundation to designing educational content and implementing tiered subscription options.
The Podia ecosystem provides all critical functionality required to operate a thriving membership business, including sophisticated promotional capabilities and engagement tools.
For those not yet utilizing this powerful platform, take advantage of the complimentary trial period to begin your membership community journey today.

Daniel NicFounder, SellingOnliceCoursesGuide.comis an entrepreneur and digital education specialist who founded sellingonlinecoursesguide.com, a platform dedicated to helping creators and educators successfully navigate the online course marketplace. Through his website, he shares insights and strategies for developing, marketing, and monetizing online educational content. His work focuses on empowering course creators to build sustainable online businesses while effectively sharing their knowledge with students worldwide.
Daniel Nic is an entrepreneur and digital education specialist who founded sellingonlinecoursesguide.com, a platform dedicated to helping creators and educators successfully navigate the online course marketplace. Through his website, he shares insights and strategies for developing, marketing, and monetizing online educational content. His work focuses on empowering course creators to build sustainable online businesses while effectively sharing their knowledge with students worldwide.

We respect your privacy and will never spam you.


