home / Best Course Platforms /Kajabi Review
We earn a commission from partner links on this site. This doesn’t affect our opinions or evaluations.
Teachable stands among the premier platforms for online course creation and frequently emerges as the first choice for content creators launching their educational journey.
If you’re ready to develop your own course using Teachable, you’ve come to the right place.
We’ve crafted this detailed Teachable walkthrough to guide you through establishing your course on the platform and launching your sales strategy.
This comprehensive tutorial walks you through every essential phase, from initial account configuration to designing your curriculum structure and crafting an effective sales page. We’ll conclude with additional expert recommendations to help you leverage Teachable’s full range of capabilities.
Now, let’s begin your course creation adventure.
To launch your course on Teachable, your journey begins with creating an account. Teachable provides a no-cost starter plan which works perfectly for initial exploration.
If you’re still evaluating whether Teachable aligns with your educational vision, take a moment to explore our comprehensive Teachable analysis.
To establish your account, navigate to Teachable.com, where you’ll immediately notice the registration section. Enter your email address in the provided field and select the Try For Free button.

Teachable’s homepage
Following this step, you’ll be prompted to enter your full name and establish a secure password for your account.
Next, select the Create Account button. The system will request additional details about yourself and your educational business venture, after which you’ll gain access to your personalized Teachable administrative dashboard.

Creating an account on Teachable
Teachable features an intuitive, streamlined administrative interface, allowing you to quickly familiarize yourself with the platform and navigate its various functionalities with ease.
Now, let’s proceed with guiding you through the creation of your inaugural Teachable course.
Teachable provides an intuitive drag-and-drop curriculum builder, enabling you to upload educational materials and structure your learning pathway with remarkable simplicity and efficiency.
To initiate course development, select Courses from the Products section in the navigation panel on the left side. This directs you to the course management area, where you can both access your existing educational offerings and establish new ones.
Click the New Course option located in the upper right corner of this interface.

Creating a course on Teachable
In the subsequent screen, Teachable will prompt you to craft a distinctive name for your educational program and designate the primary instructor, after which you can proceed by selecting the Continue button.

Entering basic course information
Your educational offering has now been established, and you can begin developing its content structure. To initiate this process, select Curriculum from the course navigation menu in the sidebar.
This selection will direct you to the interactive course development interface, where you’ll organize your course sections and individual lessons. A notable feature allows you to effortlessly reorganize lessons and content blocks by dragging and dropping them into your preferred sequence.
Within this workspace, you’ll notice the New Section and Add New Lecture functions, which enable you to incorporate organizational divisions and instructional content into your educational program.
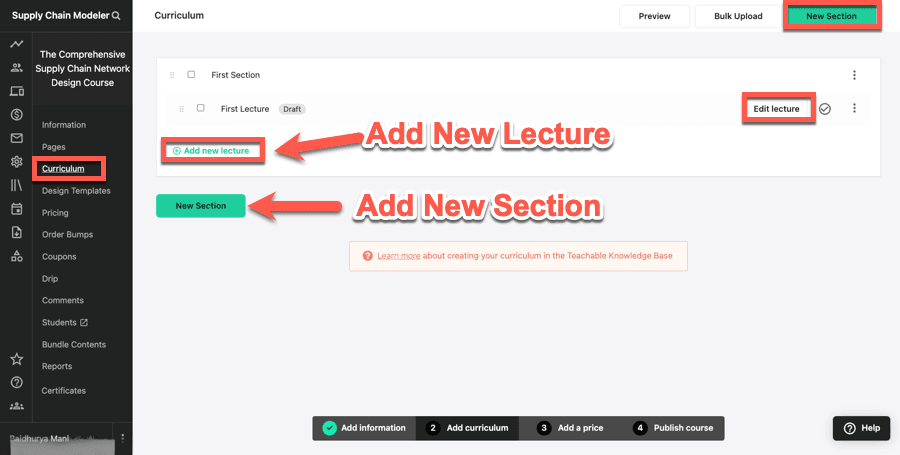
Teachable’s course builder
Once you’ve finalized your course framework, it’s time to populate your lectures with educational materials. To accomplish this, select Edit Lecture adjacent to the specific lesson you wish to enhance with content.
This action will launch the comprehensive lesson development interface, where you can incorporate various materials. On the left panel, you’ll discover all content formats supported by the Teachable platform, including instructional videos, downloadable resources, written explanations, assessment quizzes, and more.
For instance, if you intend to incorporate video instruction into your lecture, simply select the Add Video option.

Adding content to a Teachable lecture
The platform provides multiple sourcing options, allowing you to upload video files directly from your local device or import them seamlessly from cloud storage services like Google Drive and Dropbox.
A particularly valuable feature of Teachable’s lesson development interface is its versatility in accommodating various content formats within a single lesson, giving you complete freedom to arrange these elements in whatever sequence best serves your educational objectives.

Teachable supports multiple content types in the same lesson
Lastly, you have the option to enable or disable comments for your lecture.
That covers the basic process of creating a lecture and adding content. You’ll need to follow these steps for each lesson in your course.
Fortunately, there’s also a more efficient method for creating multiple lessons at once.
Teachable offers a convenient Bulk Upload functionality that allows you to import multiple files simultaneously, and the system will automatically convert these files into complete lectures.
After uploading, you can simply use the intuitive drag-and-drop interface to organize the lectures according to your preferred course structure.
This time-saving feature comes standard with all of Teachable’s paid plans and proves especially valuable when dealing with extensive course materials.
To utilize the bulk content upload option, simply select the Bulk Upload button located in the upper right corner of the builder interface. This action will launch the upload tool, where you can import numerous files directly from your computer or cloud storage.

Teachable’s bulk importing feature
Let’s explore how to implement a quiz in Teachable before advancing to our next section.
Navigate to the lesson editor and select Add Quiz from the options panel on the left side. This opens the quiz creation interface where you can craft your assessment questions individually.
Enter your question text in the designated question field and input the possible answers in the spaces below. Remember to mark the correct response by checking the selection box positioned on the left side.
You can expand your assessment by selecting Add Question to incorporate additional items. If you wish to have the system automatically evaluate student performance, simply activate the grading function using the toggle at the top of the interface.

Creating a quiz in Teachable
By default, every course lecture you create remains in Draft status until you actively release them to your students.
To make your content accessible, return to the main course builder interface, highlight all the lessons you’re ready to share, and then activate the Publish button.
During this publishing process, you’ll also have the opportunity to designate specific lectures as free preview content, allowing potential students to sample your teaching approach before purchasing.

Publishing course lectures
Teachable provides several presentation frameworks for enhancing your learning environment. To browse these options, navigate to Design Templates in the side navigation menu.
Upon arrival, you’ll notice a default template already selected with all available alternatives displayed below. The platform currently features three distinct designs named Teachable Classic, Simple, and Colossal.
The Teachable Classic framework works exceptionally well for educators prioritizing their instructional material; the Simple layout delivers a streamlined, uncluttered viewing experience; while Colossal prominently highlights your educational structure and program details.
To implement your preferred design framework, simply click the Activate button positioned beneath your chosen template.

Teachable’s design templates
An essential configuration option to consider is scheduled content release. This powerful functionality serves as a valuable resource for educational content creators, enabling you to distribute your instructional materials progressively according to a predetermined timeline.
You can access the Drip configuration through the primary navigation menu. Select this option and then choose Set Schedule. This action reveals the scheduling interface where you can specify either a precise calendar date or designate a specific number of days following enrollment, after which the particular section becomes available to students.

Teachable’s drip content settings
Teachable gives you the ability to provide achievement certificates to your students upon completion.
To generate a personalized certificate, navigate to the Certificates section within your course dashboard. If you wish to design one and connect it to a particular online course, simply access the admin dropdown menu and click on Certificates.

Creating a certificate
Teachable provides access to a diverse collection of professional certificate templates, which you can then personalize using their intuitive design editor.
You have complete freedom to incorporate your brand logo, customize the certificate text, add your personal signature, and adjust the color scheme to match your branding.

Teachable’s certificate builder
After finalizing your design, simply select the Finish button located at the top of your workspace, and Teachable will automatically deliver this professional certificate to your students when they successfully complete your course.
Beyond these primary configurations, several other valuable settings deserve your attention.
Navigate to the Information area within your dashboard. At the top, you’ll discover a dedicated branding section where you can showcase your course with an eye-catching thumbnail and engaging promotional video.

Course branding settings
As you scroll further down the page, you’ll encounter the course progression controls. Here you can establish specific learning pathways for your students. Three customizable options are available:

Course compliance settings in Teachable
To complete this section, you can personalize numerous course attributes, including the title, subject categories, custom URL, instructor information, and more. Ensure you’ve thoroughly reviewed and finalized these essential details before proceeding to the subsequent development phase.
Once you’ve successfully uploaded your educational materials and customized the various settings to reflect your teaching approach, it’s time to establish your revenue structure.
You’ll discover the monetization options in the course navigation menu under the Pricing tab. Simply select Add Pricing Plan to begin configuring your payment options.

Adding a pricing plan
Teachable provides four versatile monetization structures to match your business goals:

Course pricing options

One-time pricing option
For subscription setups, you’ll need to specify the currency, the price amount, and how often payments will occur. You have the flexibility to bill your customers on a weekly, biweekly, monthly, quarterly, or annual basis.
Furthermore, you can incorporate a complimentary trial period into your subscription package.

Subscription pricing option
Teachable provides two powerful revenue-boosting features—order bumps and upsells—designed to help optimize your customer transaction value.
With order bump functionality, you can showcase a complementary product offering directly on your course checkout page. When students choose to include this additional item, they can finalize their purchase for both products simultaneously.
Navigate to Order Bumps and select Create Order Bump to implement this feature.

Teachable’s Order Bump feature
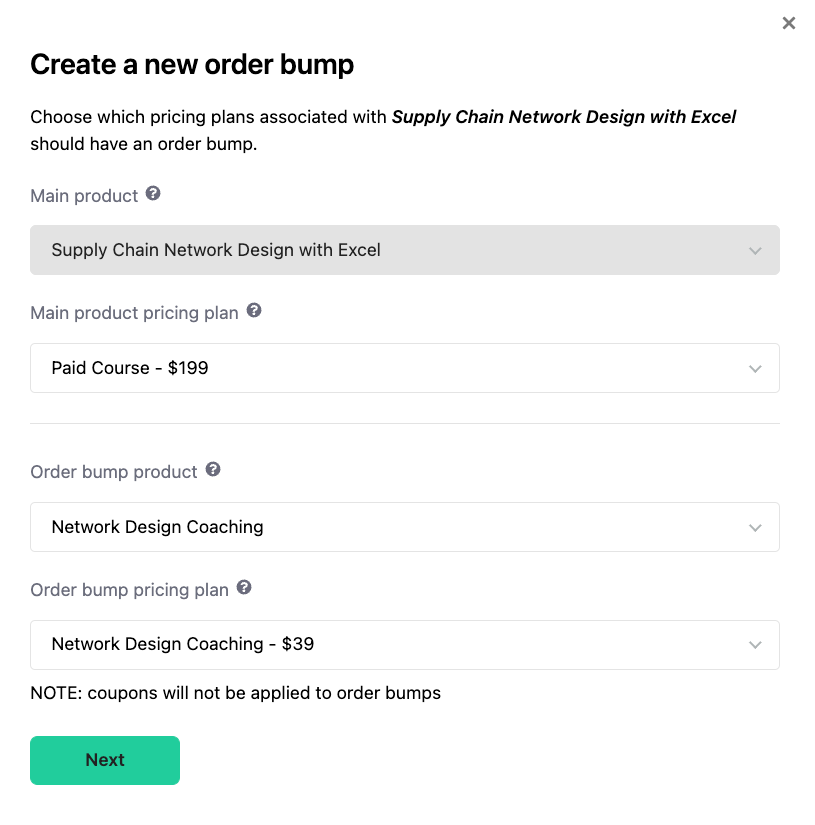
Creating an order bump

Other details for order bump
Regarding upsells, this feature similarly allows you to market additional products, but functions as a post-transaction element, enabling you to present special offers on your confirmation page or within your course content areas.
To implement an upsell on your confirmation page, navigate to the Pages menu and choose the appropriate thank you page, where you’ll find the option to incorporate an upsell opportunity. Then, identify the specific product and pricing tier you wish to feature.

Adding an upsell to thank you page
To effectively market your educational content online, you’ll need a compelling promotional page that presents comprehensive details about your course and persuades potential students to enroll.
Teachable automatically generates a marketing page for each course you create, which you can access by navigating to the Pages section within your course management dashboard.

Teachable’s default course sales page
To modify your page, select the Edit button adjacent to it. This will direct you to the design interface where you can personalize your marketing page.
Teachable’s design interface combines user-friendliness with adaptability. The sidebar displays all your current page elements, while the right panel provides a live preview of your page’s appearance.
To incorporate a fresh content element, click the Add New Block option positioned at the lower left corner of your screen.

Teachable page builder
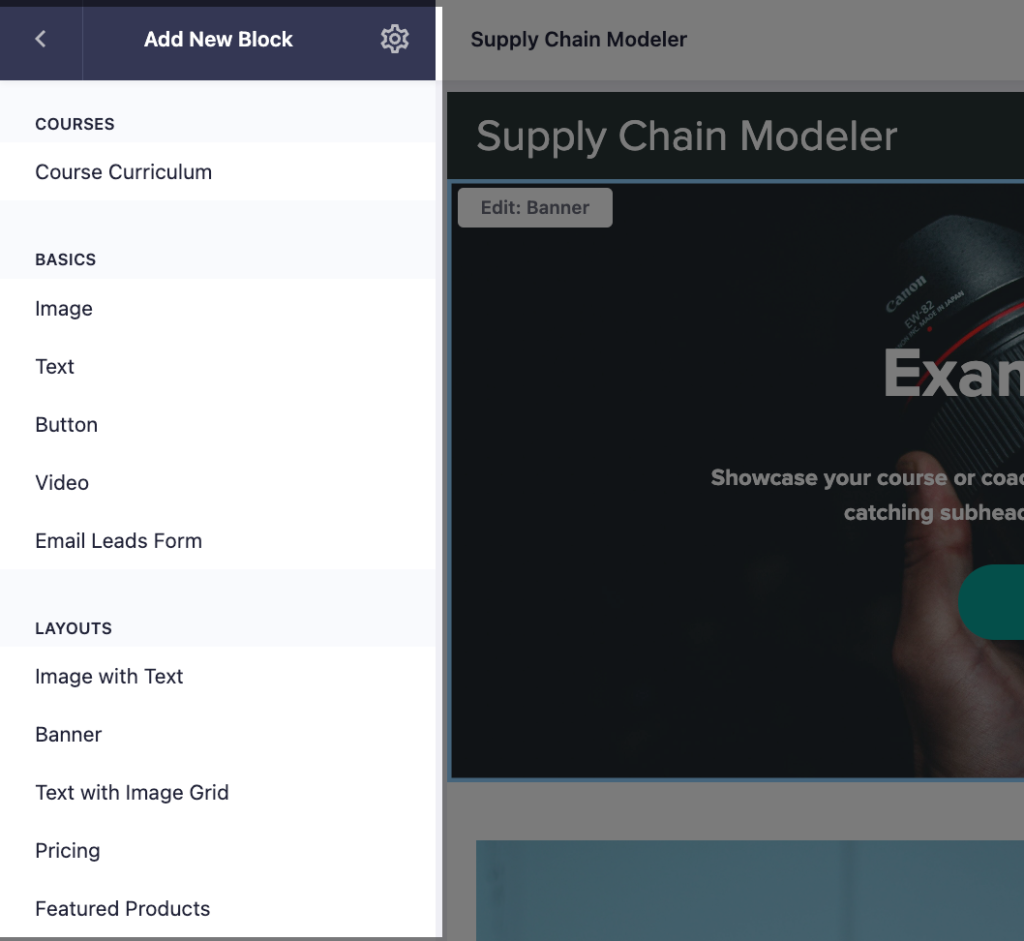
To modify any page block, simply select it either from the navigation sidebar on the left or directly within the main content area on the right. Teachable will immediately display all available customization options for your selected block.
Within the Content tab, you’ll have the ability to adjust elements such as text content, background imagery, button destinations, and more. Meanwhile, the Design tab gives you control over visual aspects including color schemes, button dimensions, spacing between elements, and other layout considerations.

Customization options for the Banner block
Upon registering with Teachable, you automatically receive a Teachable subdomain for your educational platform.
While this default address works perfectly fine, we strongly advise implementing your own custom domain for a more professional appearance. Custom domain functionality is available with any of Teachable’s premium subscription options.
To connect your personal domain, navigate to Site -> Domains. Select the Add Domain option at the top of the page and input your unique domain address.

Integrating a custom domain

Teachable email marketing integrations
Although Teachable provides robust reporting capabilities for course performance, it doesn’t offer comprehensive insights into your website visitor behavior. To gain these valuable metrics, implementing Google Analytics (GA) becomes essential.
Connecting your site with Google Analytics requires minimal effort. Navigate to Settings -> Integrations, and insert your Google Analytics tracking identifier. With this simple setup complete, you’ll immediately gain access to detailed Teachable website statistics through your GA dashboard.
For advanced users, I suggest implementing Google Tag Manager alongside Analytics, allowing you to monitor shopping cart abandonment statistics on your Teachable platform.
We consistently advise educators to thoroughly examine both their product and the enrollment process from a student’s perspective before officially launching.
To properly evaluate your course experience, consider generating a promotional code offering 100% discount. This allows you to complete a purchase using an incognito browsing window to evaluate the entire customer journey.
Once you’ve confirmed all elements function as intended, return to your course administration dashboard and activate the Publish option to make your course publicly accessible.
Your educational offering is now fully prepared for distribution to your target audience.
While Teachable doesn’t offer built-in community functionality, it seamlessly connects with Circle.so to establish a vibrant student community linked directly to your Teachable educational environment.
Circle stands among the most widely-adopted online community hosting solutions, providing powerful tools to boost student participation and develop more meaningful connections with your course participants.

Teachable’s Circle integration
Teachable offers a seamless single sign-on integration with Circle, enabling your students to access both their courses and community spaces using just one login credential. You also have the ability to incorporate Circle community discussions directly within your course lecture pages, effectively guiding students toward relevant conversation areas where they can engage with peers.
In addition to digital courses, Teachable provides robust coaching program functionality. Coaching perfectly complements your online learning materials, and numerous Teachable platform users leverage this feature to deliver more individualized guidance to their students while simultaneously boosting their income streams.
The Teachable Coaching toolkit enables you to establish clear milestones, monitor client advancement, maintain detailed session notes, and communicate directly with your learners.
Furthermore, it seamlessly connects with Calendly for appointment scheduling, making the process of arranging coaching sessions straightforward and efficient.

Teachable’s coaching feature
With Teachable’s bundling capabilities, you gain the flexibility to offer two or more of your educational products at a strategic price point. For instance, you can package your online courses, coaching services, and digital downloads together as a comprehensive bundle and market it at a premium rate.
This versatile feature also serves as an excellent foundation for creating your own membership site. As an example, you could bundle all available courses within your school and implement a monthly subscription fee that grants ongoing access to your complete educational library.

Teachable’s Bundles feature
Teachable offers robust referral program functionality, empowering you to transform your existing students into enthusiastic brand advocates.
This feature equips your learners with personalized referral links they can share with their network, and when someone utilizes these unique links to enroll in one of your courses, the referring student automatically receives an attractive discount on their future educational purchases.

Creating a referral program
Throughout this comprehensive Teachable guide, we’ve walked through every essential step required to develop and successfully launch your digital course on this powerful platform. We’ve also provided numerous strategic insights to help you maximize the potential of Teachable’s diverse feature set.
Teachable distinguishes itself from alternative platforms through its intuitive interface and sophisticated course creation tools. Even if you’re new to online education, crafting a professional, high-quality course using Teachable remains remarkably straightforward.
For those who haven’t yet experienced Teachable’s capabilities, we encourage you to register for a complimentary account and begin building your inaugural online course today.
We welcome any inquiries you might have regarding Teachable or implementing these powerful features. Please share your questions in the comments section below, and our team will gladly provide personalized assistance.

Daniel NicFounder, SellingOnliceCoursesGuide.comis an entrepreneur and digital education specialist who founded sellingonlinecoursesguide.com, a platform dedicated to helping creators and educators successfully navigate the online course marketplace. Through his website, he shares insights and strategies for developing, marketing, and monetizing online educational content. His work focuses on empowering course creators to build sustainable online businesses while effectively sharing their knowledge with students worldwide.
Daniel Nic is an entrepreneur and digital education specialist who founded sellingonlinecoursesguide.com, a platform dedicated to helping creators and educators successfully navigate the online course marketplace. Through his website, he shares insights and strategies for developing, marketing, and monetizing online educational content. His work focuses on empowering course creators to build sustainable online businesses while effectively sharing their knowledge with students worldwide.

We respect your privacy and will never spam you.


