We earn a commission from partner links on this site. This doesn’t affect our opinions or evaluations.
For educators engaged in selling online courses, providing a certificate of completion serves as a fantastic method for motivating learners and enhancing their overall engagement with the material.
Additionally, these certificates can help differentiate your educational programs from those of your competitors, making them a potent marketing asset for your brand.
However, it is important to note that some online learning systems, such as Kajabi, do not offer a native feature for creating certificates. Likewise, other popular course platforms like Teachable and Thinkific may only include this functionality in their premium subscription plans.
In such scenarios, you would typically need to design certificates using a separate tool like Canva and then manually dispatch them to each student, a task that can become exceedingly time-consuming.
Alternatively, you could opt for a specialized certificate platform like Accredible, which would introduce an additional recurring cost to your business, an option that may not be suitable for every creator.
Not long ago, while assisting a client, I decided to experiment with Google Slides as a solution for issuing certificates of completion. The results were impressive; not only did it prove to be a highly effective tool, but we also discovered a way to automate the entire certificate creation and distribution process.
In this tutorial, I am excited to share the exact method for producing a certificate of completion with Google Slides completely free of charge and then automatically delivering it to your students through Zapier.
So, let’s dive right in!
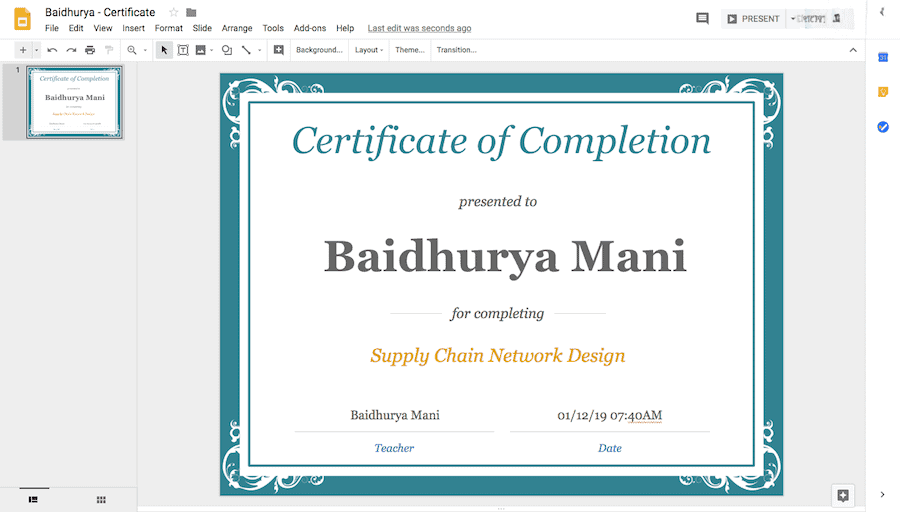
The first task in this procedure is to create your certificate master copy in Google Slides. You can design a presentation from the ground up or you can select one of the pre-built templates. For the purpose of this tutorial, we will be working with a standard template that is located here.

At this point, you will need to focus on two essential tasks.
First, you must customize the visual appearance of the certificate template, a process that is identical to editing any other presentation in Google Slides. I will leave this creative step to you, so you can adjust the design to align with your specific branding and requirements.
Second, you need to determine the specific pieces of information you want to populate on your certificate and designate them as variables within the template.
Common examples of information you would typically want to feature on a certificate are the student’s name, the name of the course, and the date of issuance.
To ensure Google Slides interprets these placeholders as variables instead of simple text, it is necessary to enclose the variable names within double curly braces.
The naming of the variable is not linked to the variable names in your course platform or other applications. For example, a variable for the student’s name can be written as {{name}} or {{student_name}} or {{user_name}}; the exact wording does not make a difference.
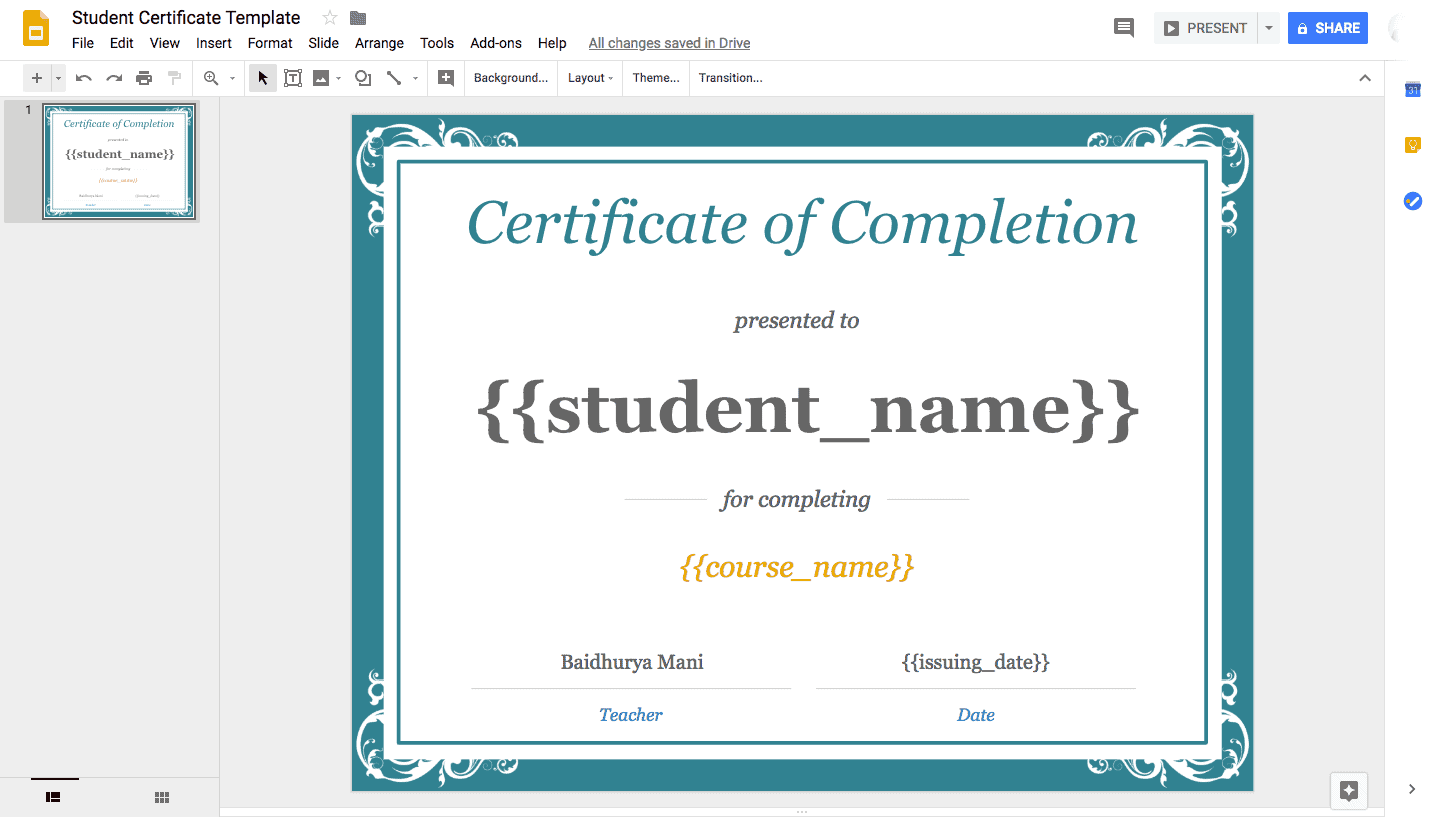
When your design modifications are complete, be sure to assign the presentation a specific name so that you can easily recognize it later in the process.
Your master certificate template is now fully prepared, and we can proceed to the next stage of configuring the system for generating the individual certificates.
To automate the creation of certificates based on student achievements in your online course platform, we will be utilizing Zapier. Zapier is an automation service that specializes in connecting different web applications so they can work together.
The majority of well-known course hosting platforms, including major names like Kajabi, Teachable, and Thinkific, feature a direct integration with Zapier. If you happen to be using a different online course system, it is important to confirm whether it offers a Zapier integration.
Zapier does have a free membership tier, but you will be required to access some of its premium capabilities to successfully create and dispatch the certificates. They do, however, provide a 14-day free trial period for these premium services.
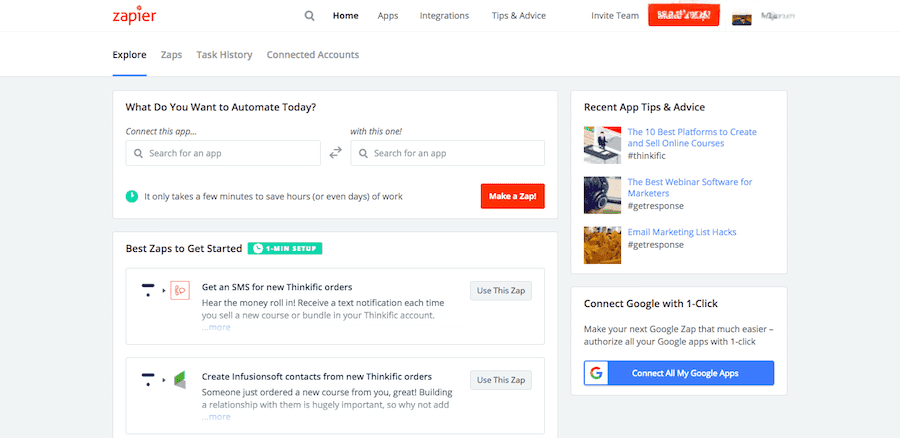
If you have an existing account, just sign in, and you will notice the ‘Make a Zap’ button located in the upper section of the dashboard. Click this button to initiate the process of building your new automated workflow.
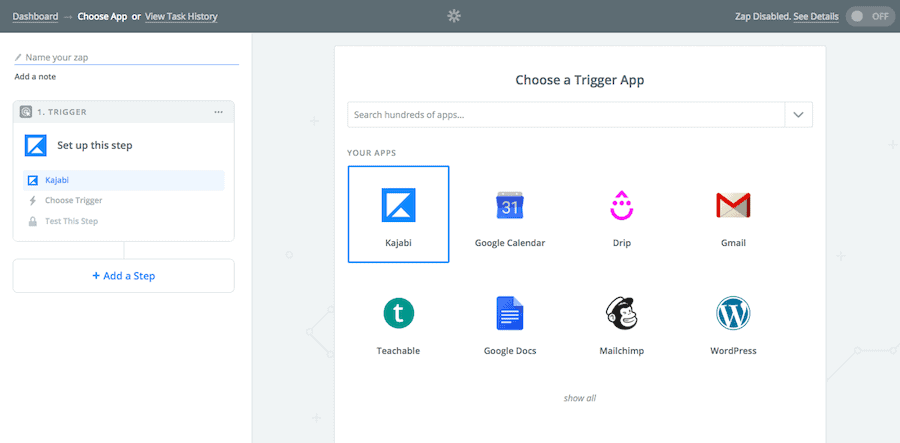
To begin, you will designate your online course system as the trigger application. As an illustration, should you be using Kajabi, you will simply search for it and then choose it from the catalog of available applications on the right.
In essence, what we are building is an automated workflow that will activate whenever a specific action occurs within your online course system.
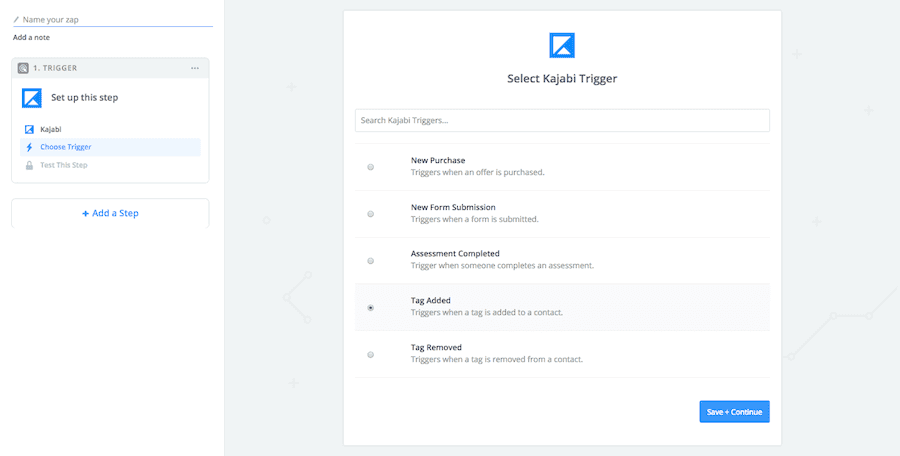
Next, you must define the initiating trigger event!
In this particular situation, our goal is to issue the certificate when a student successfully passes a quiz. Therefore, you must verify that your online course platform has a corresponding trigger for Quiz Results within Zapier.
For instance, if your platform of choice is Teachable, you would select the trigger for a New Graded Quiz Result within Zapier.
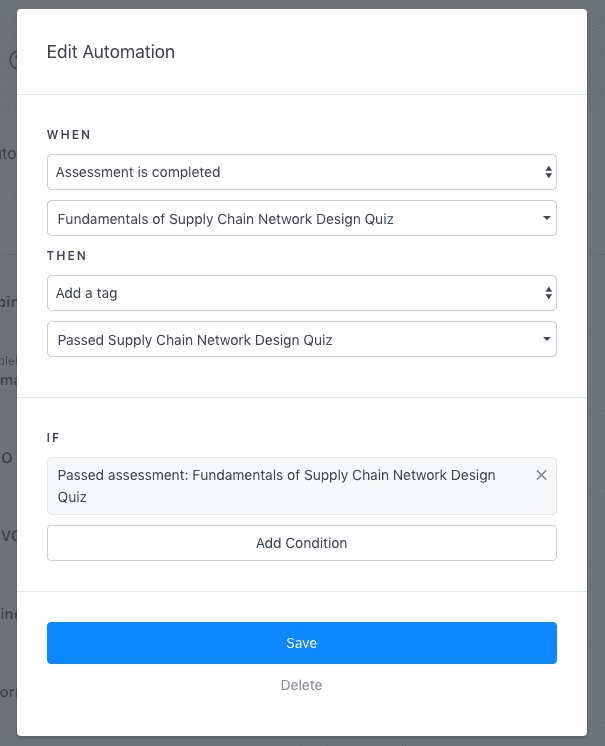
Similarly, Kajabi offers an Assessment Completed trigger which can start your Zap whenever a student finishes a quiz. However, I find that using the Tag Added trigger in Kajabi is a better approach because it offers much greater versatility.
So, you have the ability to tag your users within Kajabi upon their successful quiz completion and then use that specific tag to initiate this Zap.
Zapier will then prompt you to link your account during the next step, if a connection has not been previously established. After that, you will choose the specific tag that is intended to initiate this Zap.
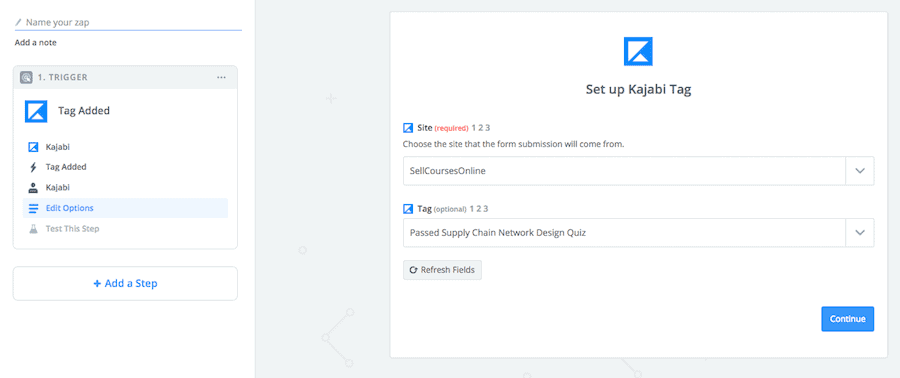
Zapier also provides an option to test your trigger, which allows you to confirm that data is being correctly retrieved from your online course platform.
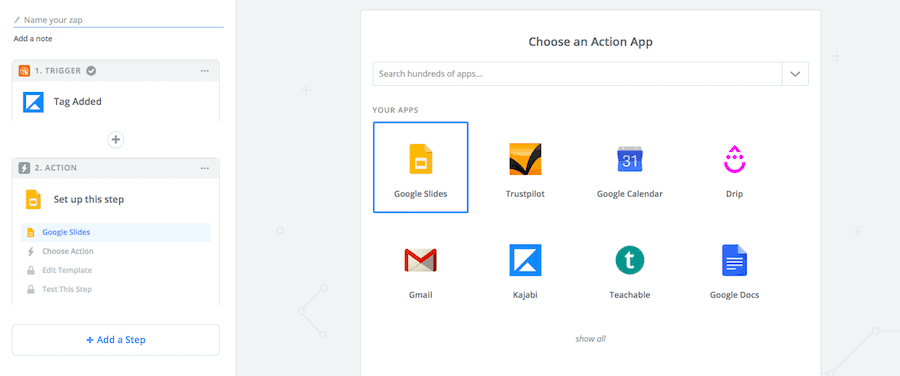
With your trigger application now fully configured, we can proceed to establish the corresponding action step. For this workflow, the action application will be Google Slides, so you will need to search for it and select it as the action app.
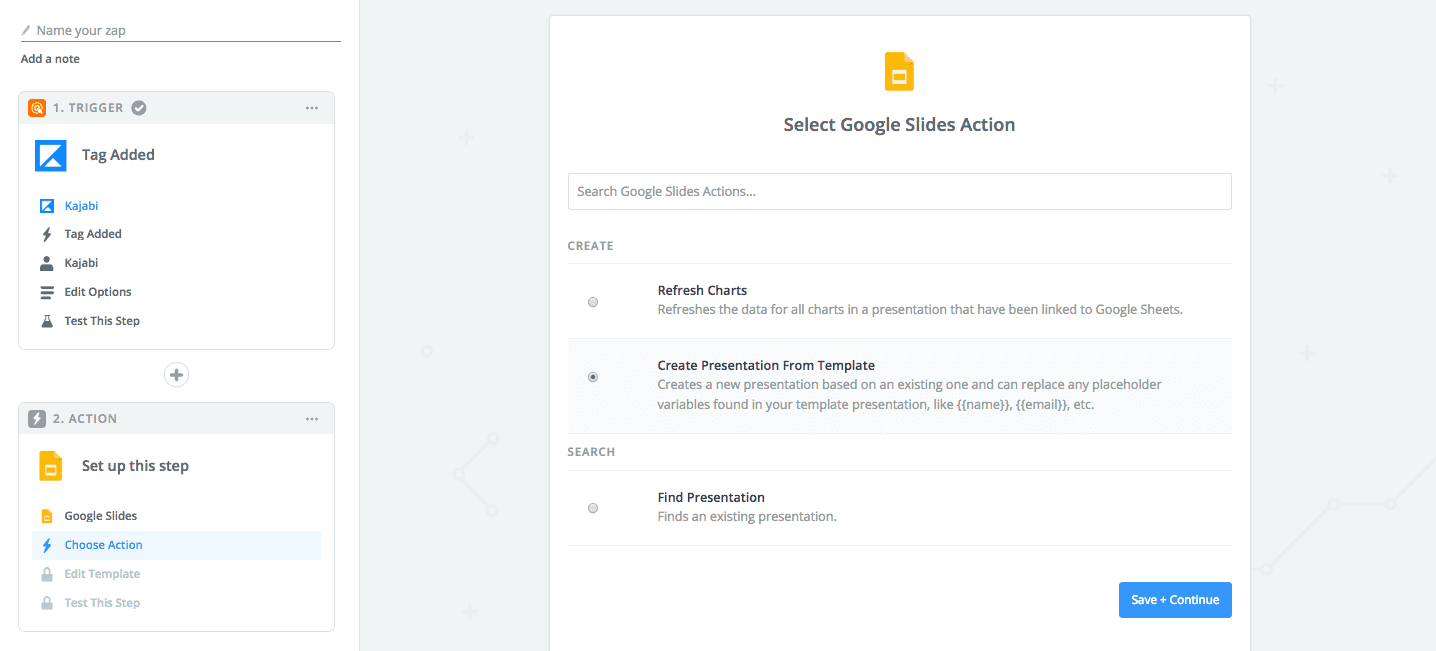
For the subsequent step in the process, you will choose the Create Presentation From Template option from the list of actions available within the Google Slides app.
The purpose of this action is to transfer student information from your course platform directly into Google Slides, utilizing the variables we set up in step #1.
Now, it is time to specify which pieces of data will be transferred to your Google Slides presentation. Essentially, we need to map out what information goes where.
The screenshot provided below illustrates how to configure these settings.
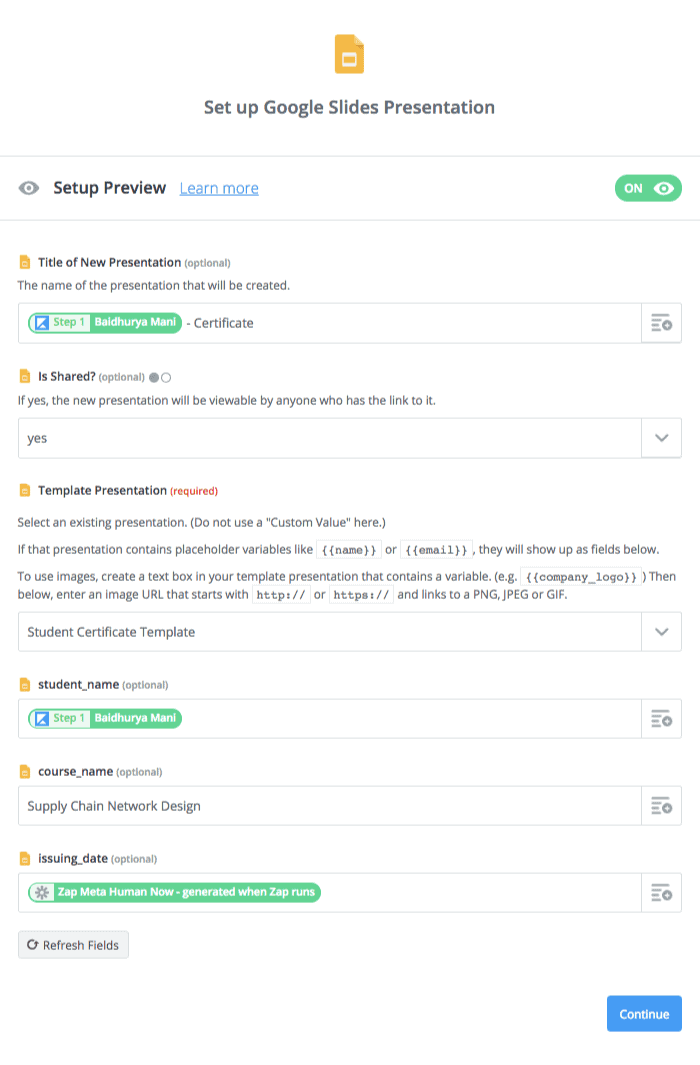
You can now select the “Create & Continue” button to preview how the final certificate will appear. This will instruct Zapier to generate a new presentation inside your Google Slides account.
As demonstrated in the screenshot below, you will observe that Zapier has successfully generated a custom certificate for your student, which confirms that our automated workflow is operating correctly.
Adopting the strategy of tagging students within Kajabi provides assurance that the user has successfully passed the quiz before this automated workflow is initiated.
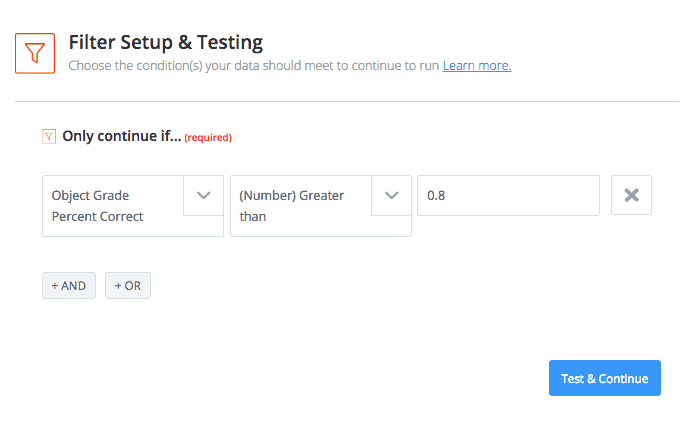
However, if you were to utilize the native quiz result trigger for either Teachable or Kajabi in Zapier, the automation would activate every time a user finalizes a quiz, regardless of whether they achieved a passing score.
The solution in this situation is to insert a filter step between your trigger and action applications. Here, you can define a condition that the student’s score must be higher than the passing score. This will guarantee that a certificate is generated only when a student has successfully passed the quiz.
So, the foundational setup for generating a certificate within Google Slides is now complete, and at this point, we can enhance the Zap to ensure the certificate is also delivered to the student automatically.
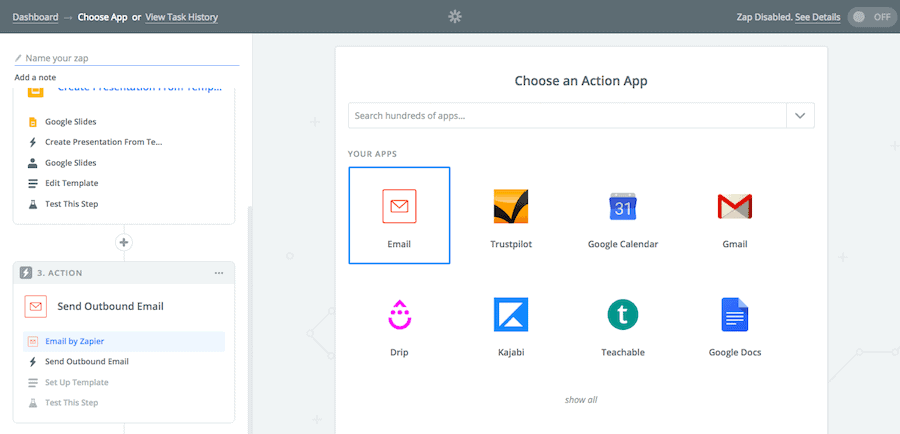
To enable the automatic delivery of the certificates, it is necessary to introduce an additional step to our Zap. This will transform it into a multi-step Zap, and the new component will be the Email by Zapier application.
Therefore, proceed by adding another action app at the conclusion of your workflow, selecting Email by Zapier.
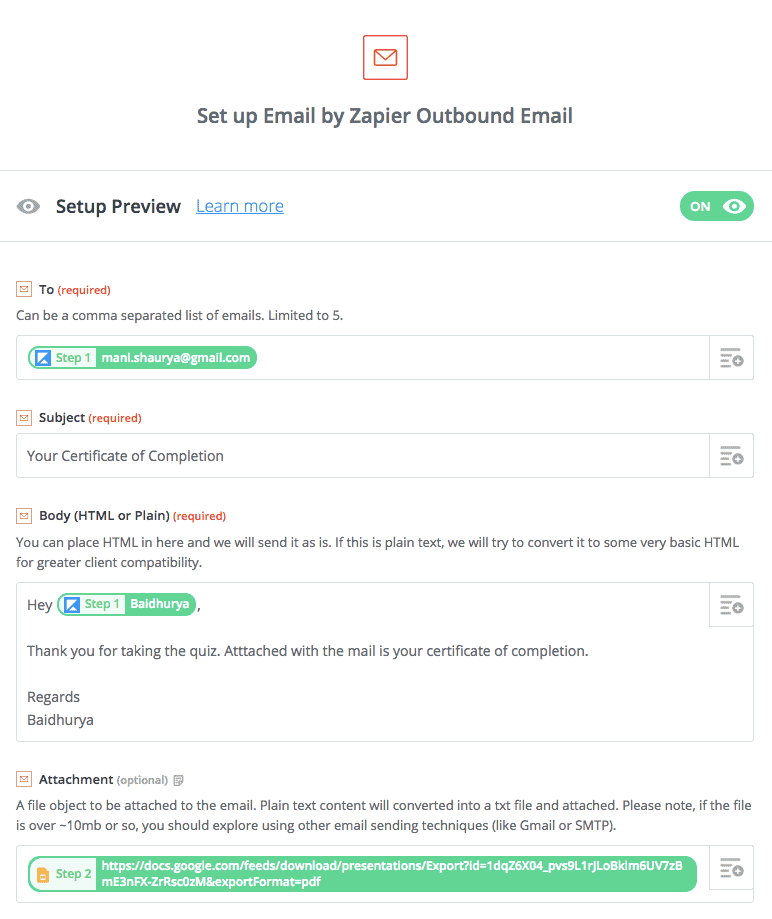
Next, you will configure the email message itself. You can pull the student’s email address from your initial trigger application and place it into the ‘To’ field. You will then need to compose a subject line and the main content of the email.
The message body and the subject line can be a personalized mix of static text and dynamic variables, as demonstrated in the accompanying image.
Finally, it is crucial that you select the Export Links Application/pdf option under the attachment setting. This step guarantees that a PDF copy of the certificate will be included with the email sent to the user.
There are also additional fields like From Name and Reply To, which are not required but provide you with the option to further customize the email’s appearance if you wish.
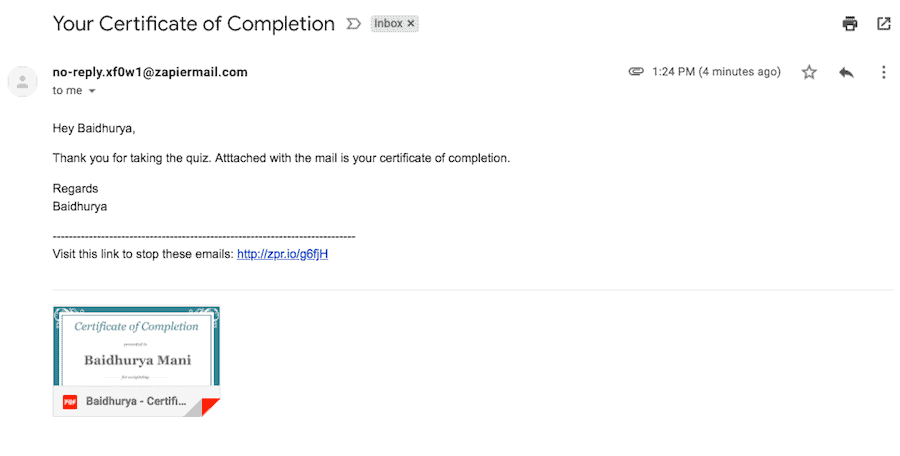
Now, select ‘Create & Continue’ to verify this part of your Zap. During my own test, Zapier delivered an email that looked just like this:
You can now select the ‘Finish’ button and then proceed to activate your Zap. You always have the flexibility to go back and make adjustments to your certificate template, your email message, and other settings.
Once your Zap is running, it will automatically generate and dispatch a certificate to any student who completes a course within your platform.
This particular method functions exceptionally well for a no-cost solution, and I suspect you are already impressed with its potential!
I also anticipate that you may have several questions about its capabilities, such as “can it do this?” or “can it do that?” Therefore, let me address a few of the most likely inquiries regarding certificate creation with Google Slides and Zapier.
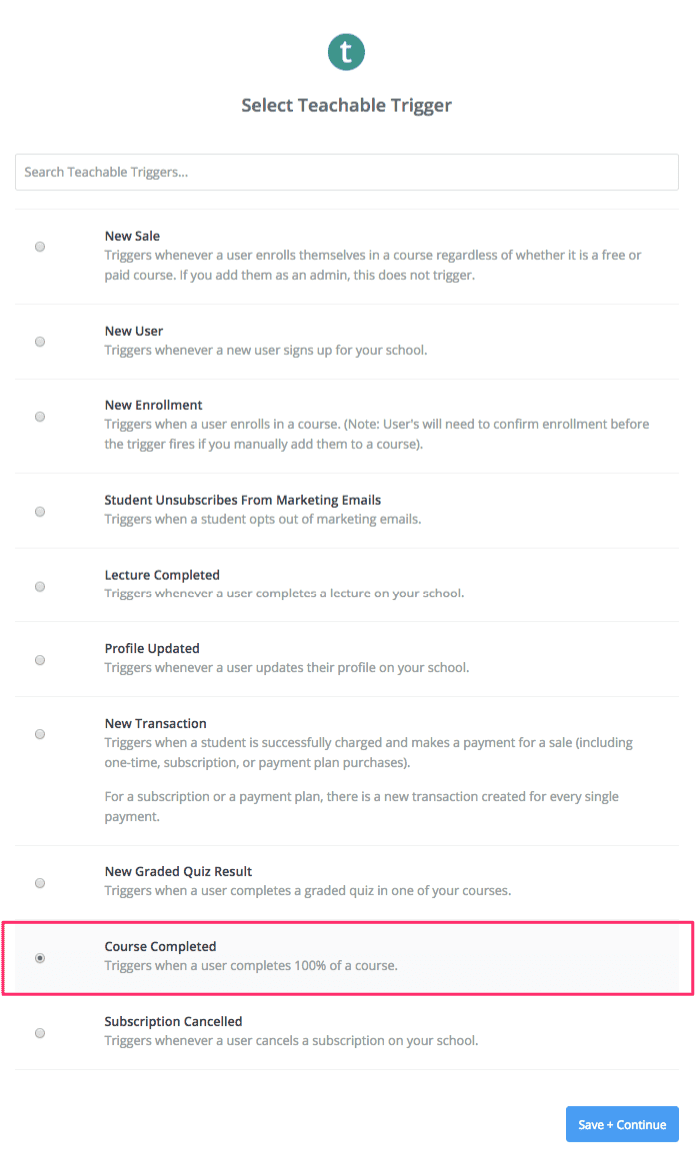
The solution for this will be determined by the specific online course platform you are utilizing. For users of Teachable or Thinkific, there is a dedicated trigger for Course Completion available within Zapier.
Therefore, you will just need to substitute the existing Quiz Result trigger with the Course Completion one in your Zap, while the rest of your automated setup can stay exactly as it is.
For those utilizing Kajabi, there is no native trigger for Course Completion in Zapier, and there isn’t a simple way within Kajabi to automatically tag users once they finish a course.
As a clever workaround, you can leverage the Content Locking feature to ensure users progress through all lectures sequentially. When they finish the final lesson, an automation can be set up to apply a specific tag, which can in turn be used to initiate the Zap.
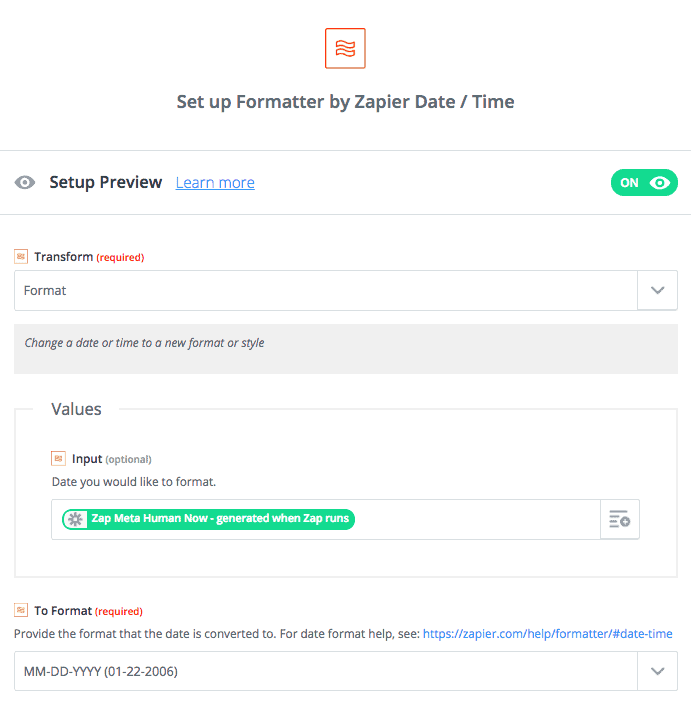
The standard date format that Zapier provides includes both the date and the time. If you wish to adjust this presentation, you will need to use the Formatter App, a built-in utility within Zapier.
The Formatter step should be positioned in your Zap immediately before the Google Slides step, which allows it to pass the correctly formatted date to your certificate template.

Once the Formatter app is properly configured, you will need to adjust the Google Slides step to map the output from the Formatter directly into the date field of your template.
With this final adjustment made, the correctly formatted date will be applied to your certificates from this point forward.
To incorporate a unique verification ID onto your certificates, your initial action is to edit the template you originally created in the first step. You will need to insert a new variable, for instance {{verification_id}}, directly into your certificate design.
The majority of course platforms generate a distinct ID for each user, as well as for individual lectures and courses, and this data is typically accessible through Zapier. Therefore, your task is to combine these available variables in a way that guarantees a unique final result.
For example, if you are a Teachable user, you could combine the User ID with the Lecture ID. In a similar fashion, if you are on the Kajabi platform, you could merge the Contact ID with the Tag ID to generate a distinct verification code.
Ultimately, the challenge lies in devising a method to produce these unique codes by creatively combining the available data points.
The automated setup detailed in this guide is just the beginning; you can certainly expand upon this foundation.
For instance, you could create a more advanced workflow that issues a certificate only when a student has both successfully passed a specific quiz and finished the entire course. While this may require some creative solutions, it is entirely achievable.
The potential applications for issuing certificates are numerous, and the only real constraint is your own creativity and imagination.
Should you have any further questions or innovative ideas to contribute, please feel free to share them in the comments section below.

Daniel NicFounder, SellingOnliceCoursesGuide.comis an entrepreneur and digital education specialist who founded sellingonlinecoursesguide.com, a platform dedicated to helping creators and educators successfully navigate the online course marketplace. Through his website, he shares insights and strategies for developing, marketing, and monetizing online educational content. His work focuses on empowering course creators to build sustainable online businesses while effectively sharing their knowledge with students worldwide.
Daniel Nic is an entrepreneur and digital education specialist who founded sellingonlinecoursesguide.com, a platform dedicated to helping creators and educators successfully navigate the online course marketplace. Through his website, he shares insights and strategies for developing, marketing, and monetizing online educational content. His work focuses on empowering course creators to build sustainable online businesses while effectively sharing their knowledge with students worldwide.

We respect your privacy and will never spam you.


