We earn a commission from partner links on this site. This doesn’t affect our opinions or evaluations.
For eliminating Kajabi’s branding, your subscription must be at the Growth plan level (priced at $199 per month) or a superior tier.
Nevertheless, should this particular choice not align with your financial plan, it’s not a major concern. The platform’s branding is quite subtle, and the majority of your website’s audience will likely overlook it.
Should you opt to proceed with removing the Kajabi branding, the procedure is straightforward. Navigate to your administrative dashboard, and from there access Settings, followed by Site Details.
Google Slides has progressively developed into a powerful substitute for PowerPoint. Its intuitive design, features supporting teamwork, and wide selection of pre-made layouts, supplementary tools, and functional extensions contribute to its growing appeal.
Even though Google Slides serves as an exhaustive instrument employed by a wide range of users, it is missing a crucial component: an integrated sound recording function.
Circumstances frequently occur where the requirement is to produce presentations recorded in advance instead of presenting them in real-time, which makes the capacity to embed audio within Google Slides indispensable.
Additionally, augmenting your presentation materials with spoken commentary provides a superb technique for crafting video content suitable for your online educational programs or interactive seminars.
Consequently, we have prepared this detailed guide to illustrate the process of integrating voice commentary into Google Slides presentations. We will examine a couple of different techniques, enabling you to choose the one most aligned with your specific requirements.
In closing, we will also offer professional advice regarding the improvement of your voice-over quality and the production of more engaging video-based presentations.
Let us commence our examination of these approaches.
Integrating sound files into Google Slides is a comparatively straightforward procedure. This method entails generating recordings using a separate audio capture utility and subsequently transferring these sound files from your Google Drive directly into your presentation’s individual slides.
ATTENTION: This primary technique is ideally suited for individuals aiming to augment their presentations with spoken commentary; however, if your objective is to create an entire video presentation utilizing Google Slides, you may find it beneficial to proceed directly to Method #2.
Possessing your audio material ready beforehand offers a considerable benefit. Otherwise, it will be necessary for you to generate voice recordings by employing external recording software.
Adhere to these uncomplicated directions, and you will achieve full functionality in a very short period.
When incorporating spoken commentary into your slideshow, commence by preparing a detailed script for every single slide within your presentation sequence.
Understandably, the caliber of your audio can significantly impact your presentation’s overall success; therefore, make certain to record within a sound-managed setting utilizing a superior-grade microphone.
A multitude of sound recording applications are accessible, encompassing advanced choices such as Audacity, which demands a greater degree of technical proficiency to operate.
More straightforward options that sufficiently fulfill this requirement consist of Voice Recorder for Windows-based computers and Voice Memos for individuals using Mac systems.
After you have chosen your desired recording software and configured your microphone, produce your voice commentary, and during the export process, confirm that you save the files in either MP3 or WAV format to ensure full compatibility with Google Slides.
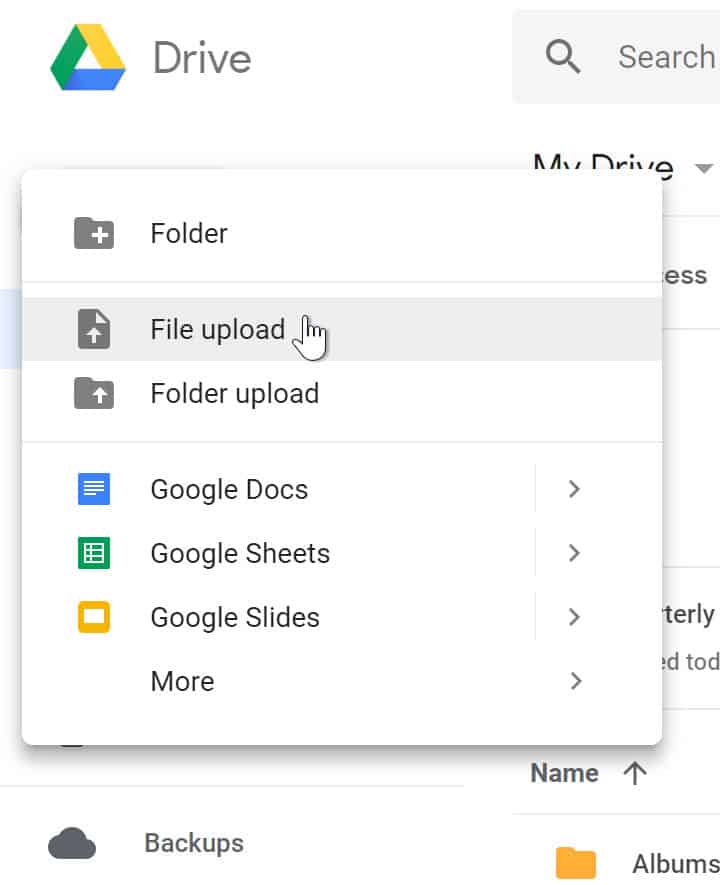
Upon completing the preparation of your sound recordings, open your Google Drive, click on New located in the Tools menu, proceed to the File Upload selection, and then pick the specific audio file or files you intend to transfer.
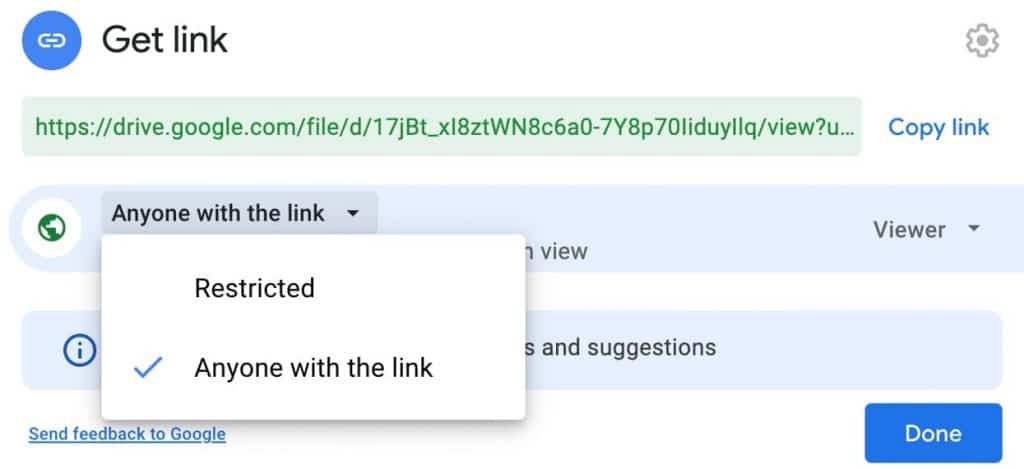
Once the file transfer process concludes, you should then perform a right-click directly on the pertinent filename and proceed to choose the Share selection from the menu that appears.
You must then remove any existing access restrictions by adjusting the settings to make it accessible to anyone possessing the link. This absolutely essential procedure guarantees that every individual who receives your presentation will also be fully capable of hearing your audio recordings.
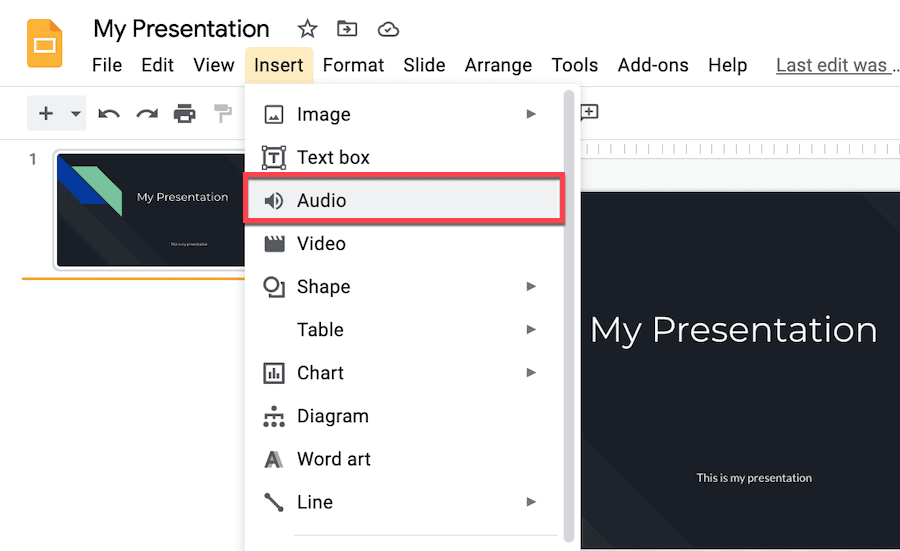
To begin, access the specific Google Slides presentation to which you plan to append the voice commentary and then choose the particular slide where you intend to place the audio file.
From the main Insert menu, opt for Audio and subsequently select the appropriate audio file directly from your Google Drive.
You have options to control the sound’s intensity and choose if the audio track begins instantly or awaits a manual click for activation.
Should you opt for click-initiated audio playback, the audience member retains control, deciding when to hear the sound during the slideshow, preventing automatic startup.
If you configure the audio for automatic initiation, you can then conceal the compact player graphic, given that it’s no longer necessary.
A Loop selection exists for you to activate when desiring the audio to play back perpetually. For confining the audio’s duration to a singular slide, choose the setting that will stop on slide transition. Without enabling this specific choice, your sound will naturally extend its playback onto the following slide too.
You can now replicate this process for all your distinct slides and subsequently validate the entire presentation to affirm proper operational status.
The alternative method for incorporating spoken narration into your Google Slides involves employing a screen capture application. Using this technique, you capture all activity on your display, encompassing your slideshow and your audio input.
Should your goal be creating an independent video for varied uses, instead of merely embedding a sound file within Google Slides, this pathway is recommended, proving highly effective for the majority of users because:
Although numerous screen capture programs exist commercially, and your choice is personal, this manual will detail two specific options: Zoom and Camtasia.
Whereas Zoom functions as a web-based conferencing tool enabling session recording, Camtasia serves as a dedicated application for screen capture and video refinement.
The most economical and straightforward method for capturing your Google Slides involves initiating a Zoom meeting, activating your microphone, broadcasting your display, and clicking the record function.
This platform additionally permits webcam recording, and upon conclusion of the meeting, Zoom automatically stores the captured footage onto your local machine.

This particular approach is excellent for performing a swift screen capture and functions exceptionally well if your task involves recording only a limited number of slides along with a brief voice-over.
Furthermore, utilizing Zoom for recording is perfectly suited for scenarios where your presentation includes dialogues with additional attendees or features several individuals elucidating various segments of the presentation.
For your information, Zoom lacks any features for video modification or improvement, meaning you must achieve a perfect recording in a single attempt.
Imagine you are producing a video for an online educational program and desire an exceptionally polished end result; in this situation, Zoom would not be your optimal choice, and it is advisable to utilize specialized software like Camtasia.
Camtasia represents a comprehensive screen capture solution that offers enhanced adaptability during the recording phase and includes a robust video editing suite.
Employing Camtasia is uncomplicated, and it will require you to download its desktop application, available for both Windows and Mac operating systems.
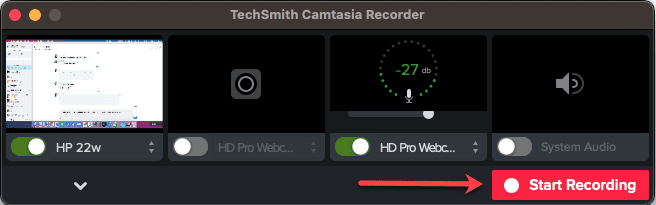
Upon starting the Camtasia recording tool, you must designate the specific portion of your screen you intend to capture, choose the correct audio input device, and subsequently press the Record button.
You possess the capability to halt and then continue the recording process as needed, and you can conclude the recording session once you are finished.
However, the genuine strength of Camtasia becomes evident during the video editing stage. Below are several common enhancements users apply within Camtasia:
In essence, this alternative provides you with the greatest degree of control when capturing your video content using a Google Slides presentation and is most suitable for dedicated video production professionals.
Within this segment, I will impart some expert advice on how you can significantly improve your video presentation. You might not require every suggestion detailed here, so please make your choices accordingly.
The standard of your audio can significantly determine the success or failure of your presentation or video. Consequently, when you intend to record a voice-over, your foremost thought should be on achieving high-fidelity audio capture.
Guaranteeing that your spoken commentary is pleasant for the listener will boost the presentation’s attractiveness and prevent unneeded interruptions.
Nevertheless, producing pristine audio and eliminating intrusive background sounds can present a considerable difficulty.
Therefore, here are several uncomplicated recommendations you can implement to ensure your Google Slides voice-over is distinct, sharp, and devoid of any ambient interference.
The most effective method to prevent unwanted noise in your audio is to maintain the recording space as tranquil as feasible:
I personally prefer to conduct a preliminary recording of the ambient sound within my room (without speaking) for approximately ten to twenty seconds. Afterwards, I review this recording and endeavor to pinpoint the origins of any noise to address them.
An additional highly effective technique for eradicating background noise during a voice-over recording is to utilize a noise-canceling application such as Krisp.
Krisp is an AI-driven noise suppression utility that inserts a virtual acoustic barrier between your microphone and the recording software to prevent background disturbances.
It functions compatibly with all prevalent recording instruments, including Zoom, Camtasia, Audacity, and others, and it is available for use on both Windows and Mac operating systems.
Should you capture your spoken commentary and audio using a video modification application such as Camtasia, eliminating ambient disturbances becomes straightforward. This software includes integrated features for noise reduction, assisting you in achieving pristine sound quality.
Camtasia enables the purification of your sound recordings from undesirable interference by conveniently applying its specialized Noise Removal feature directly to the audio segment affected by ambient sounds.
You have the choice to automate the noise suppression process using its dedicated Analyze capability or to meticulously refine the audio output yourself through the Amount, Reduction, and Sensitivity controls.
Incorporating spoken commentary into a Google Slides presentation enhances its engagement; however, it is crucial to produce narration that perfectly aligns with the visual information displayed.
A highly effective method for accomplishing this synchronization involves capturing the visual elements and the sound components as distinct entities.
The initial phase of this procedure involves composing a comprehensive script covering your complete presentation. Subsequently, play through the slideshow while rehearsing the script aloud until your delivery is flawless.
When you feel prepared, capture the entire audio narration based on your script in one continuous session, as managing a single audio file is considerably simpler than handling several.
Lastly, capture your computer screen activity as you navigate through the slide sequence, and then store this recording independently as a distinct video file.
At this point, you can effortlessly synchronize the audio and video elements using Camtasia. Its timeline functionality and capacity for multi-track editing simplify the process of managing multiple such files.
Although a superior voice narration can render your presentation compelling, introducing understated background music can elevate its impact further. The essential principle is to avoid excess and employ it judiciously.
Should you desire to combine background music with spoken commentary in your presentation, it will be necessary to navigate solutions involving external applications.
The primary method involves employing an audio modification utility like Audacity to craft a composite of your commentary, musical scores, and sound enhancements before moving the audio file to Google Drive and integrating it into your Google Slides.
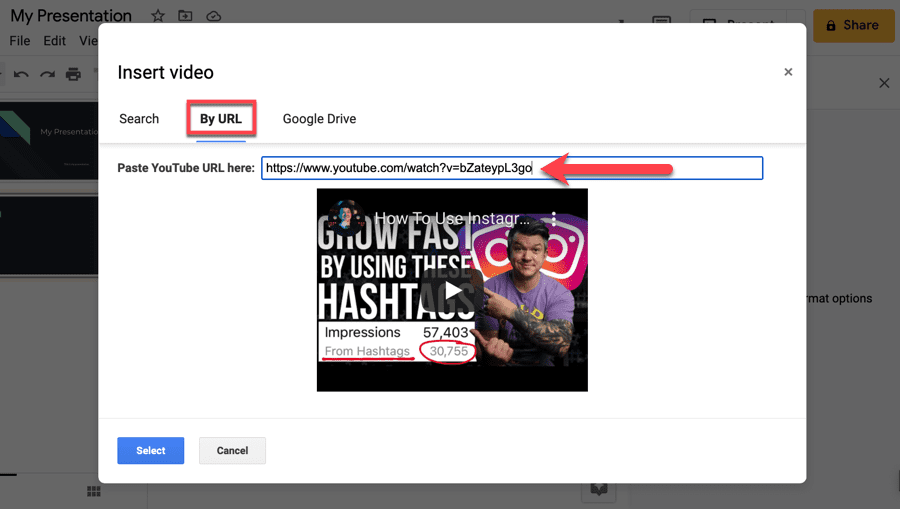
An alternative technique involves inserting a video into the slides in a way that it remains unseen during the actual slideshow.
In particular circumstances, you might prefer not to utilize your own voice for the narration recording; in such instances, you could contemplate employing an artificial intelligence-driven Text-to-Speech application for your voice-over requirements.
These kinds of utilities were previously viewed as somewhat unrefined, yet the underlying technology has advanced considerably over recent years, and they are now capable of delivering a remarkably human-like vocal quality for your audio recordings.
My preferred artificial intelligence voice-over instrument is Murf.ai, because it greatly simplifies the task of generating a vocal narration.
You have the option to either input the script text directly or transfer your personal voice recording to obtain a professional-grade audio track for your video production using this application.
Murf.ai streamlines the process of synchronizing your vocal delivery with the corresponding slides. You can introduce pauses, alter the vocal pitch and speaking rate to perfectly coordinate the voice-over with the presentation, thereby negating any necessity for subsequent editing.
It is important to remember that one cannot anticipate an entirely natural-sounding AI-generated voice; however, if you are disinclined to use your own voice and also wish to avoid the additional expense of hiring a voice-over professional, Murf.ai can prove to be exceptionally beneficial.
Although direct audio recording within Google Slides is not natively supported, incorporating a voice-over is a relatively uncomplicated process. Depending on your specific needs, you can select one of the two distinct approaches detailed within this comprehensive guide.
If your objective is to create a standard presentation featuring some audio elements, you should adopt the initial method. In this scenario, you would record your audio independently and then integrate it into your Google Slides presentation.
Conversely, if your aim is to produce a self-contained video utilizing your presentation materials, you ought to pursue the second strategy, which involves the use of a dedicated screencasting application.
Irrespective of the technique you employ, introducing a voice-over to Google Slides can transform it into a more captivating and interactive experience for your viewing audience.
And as you become more proficient with the methodology, you can further enhance your content to a superior standard by implementing some of the valuable suggestions shared in the preceding section.
I trust that this instructional manual has effectively taught you how to incorporate voice narration into Google Slides. Should you have any inquiries, please feel free to post a comment below.
An online community platform is a software that lets you create a website where people with common interests can connect and interact. The platform provides the infrastructure for members to communicate and collaborate with each other, share content, and participate in activities and events.
Choosing the right platform for your community depends on the type of community you’re building, the features and functionality you need, your technical know-how, and your budget. However, a good community builder should offer the essential tools for content creation, community organization, member management, moderation, etc.
Circle is the best all-around community platform that works well for creators as well as brands. In addition, Mighty Networks and BuddyBoss are also great options for creators.
BuddyBoss is the best community plugin for WordPress users, as it is the only robust WordPress-based option that offers a complete suite of community-building features. It also integrates with other popular plugins like LearnDash and Gamipress.
The best way to get your community app is to subscribe to a community builder that lets you create branded apps. There are a few providers out there, like Mighty Networks, BuddyBoss, and Disciple, that provide this service.
There are many ways to build community engagement, but some of the most effective methods include creating valuable content, hosting events and meetups, community gamification, etc.

Daniel NicFounder, SellingOnliceCoursesGuide.comis an entrepreneur and digital education specialist who founded sellingonlinecoursesguide.com, a platform dedicated to helping creators and educators successfully navigate the online course marketplace. Through his website, he shares insights and strategies for developing, marketing, and monetizing online educational content. His work focuses on empowering course creators to build sustainable online businesses while effectively sharing their knowledge with students worldwide.
Daniel Nic is an entrepreneur and digital education specialist who founded sellingonlinecoursesguide.com, a platform dedicated to helping creators and educators successfully navigate the online course marketplace. Through his website, he shares insights and strategies for developing, marketing, and monetizing online educational content. His work focuses on empowering course creators to build sustainable online businesses while effectively sharing their knowledge with students worldwide.

We respect your privacy and will never spam you.


