We earn a commission from partner links on this site. This doesn’t affect our opinions or evaluations.
Kajabi stands as a leading integrated solution among all-in-one course platforms. The system delivers an impressive array of tools specifically designed for hosting both live and evergreen webinar presentations.
Have you wondered exactly how to develop webinars within Kajabi? What specific capabilities does this platform provide users?
Throughout this comprehensive guide, we’ll explore Kajabi’s webinar functionality in detail and provide you with clear, step-by-step instructions for developing both live interactive sessions and evergreen recorded presentations.
Let’s dive right into the essential details!
While Kajabi primarily serves as a comprehensive knowledge commerce solution, it also functions as a powerful sales funnel software that enables users to develop and deliver professional webinar presentations.
Webinars involve several essential components, including registration systems, scheduling functionality, live broadcasting capabilities, and more. Kajabi provides numerous specialized features to effectively manage all these elements.
The Kajabi Events feature serves as the primary tool for creating webinar experiences within the platform. This versatile system allows you to establish single-session or recurring events, customize your scheduling options, and develop automated communication sequences including reminder emails and post-webinar follow-up messages.

Additionally, Kajabi offers a robust page building system for developing all essential webinar components, including registration forms, confirmation pages, and content delivery interfaces.
When it comes to creating effective Kajabi webinars, the standout functionality is undoubtedly the Funnels feature. This integrated tool streamlines the entire webinar creation process by allowing you to configure your event settings, design necessary pages, manage broadcast options, and incorporate product offers—all from a centralized dashboard.
It’s worth noting that while Kajabi doesn’t provide built-in broadcasting or streaming capability, you can seamlessly integrate YouTube Live to power your webinar presentations.
The advantage of YouTube Live integration lies in its cost-effectiveness (completely free), exceptional streaming quality, and straightforward implementation process that makes embedding live content onto your Kajabi pages remarkably simple.
Furthermore, these comprehensive webinar tools are accessible across every Kajabi subscription tier, enabling you to develop professional webinar experiences regardless of which plan level you’ve selected.
As previously highlighted, the Events functionality serves as your primary tool for developing webinars within the Kajabi platform, and throughout this section, we’ll provide you with comprehensive insights into utilizing this powerful feature.
For existing Kajabi subscribers, simply access your account through the login portal. New users will need to register for a complimentary trial before proceeding.
To initiate an event creation process, first locate the Marketing section within your administrative dashboard, then select the Events option from the available menu.
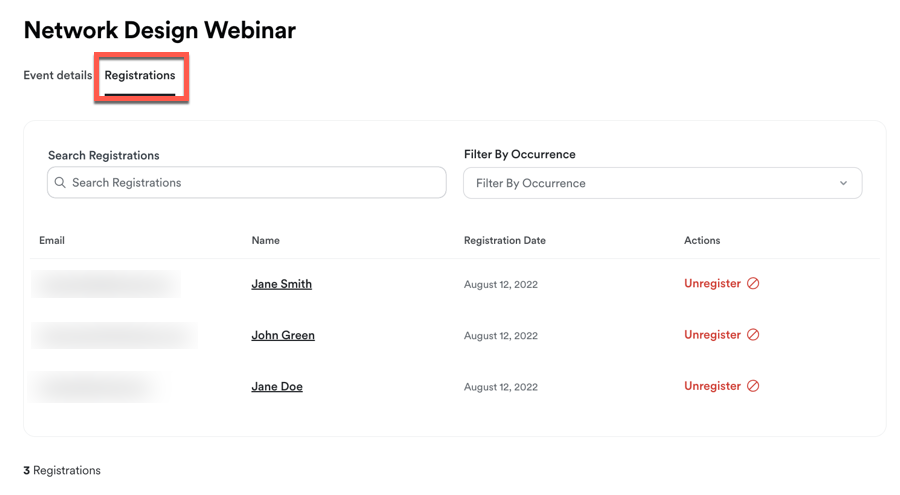
This interface displays a comprehensive inventory of your existing events. When ready to develop a new webinar, click the + New Event button positioned in the upper right corner of your interface.

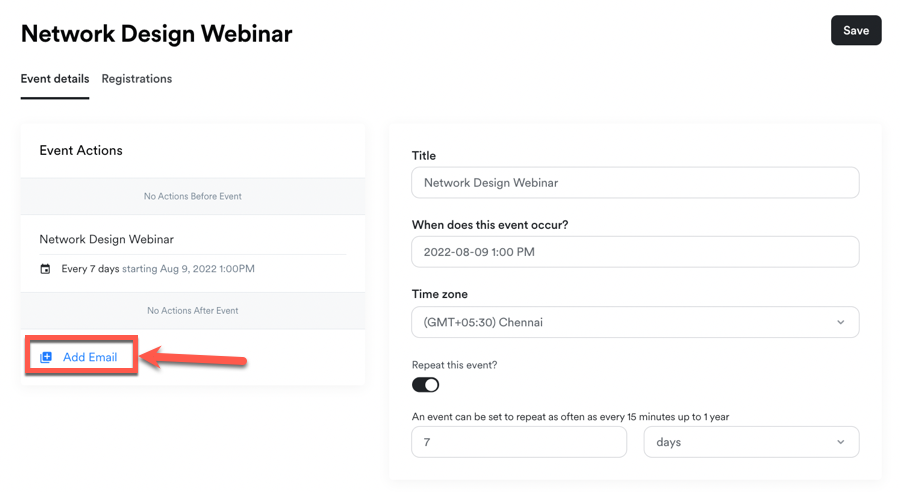
Following this, you’ll be prompted to specify the desired date and time for your webinar session. Additionally, based on your specific webinar strategy, you have the flexibility to configure the event as either a single occurrence or establish it as a recurring presentation.
When developing an evergreen webinar experience, you can leverage the Repeat This Event functionality to automatically schedule your presentation on a daily basis or even program multiple sessions throughout each day.

After clicking the Save button, Kajabi processes your event creation request and generates your webinar framework, allowing you to proceed with additional configuration options such as implementing communication sequences and establishing automated workflows.
Let’s begin by configuring your event communication strategy. These email messages serve crucial purposes—from delivering webinar notifications to participants to executing post-event follow-up communication.
Located on the left portion of your interface, you’ll find the Event Actions control panel. Select the Add Email option to begin developing your communication sequence.
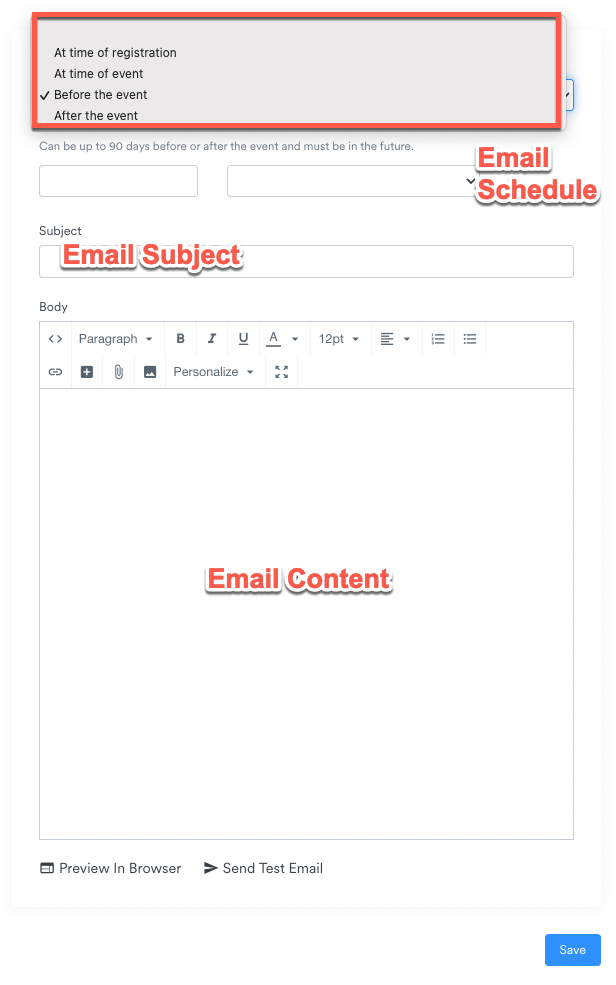
The initial step in establishing your event communication involves determining the optimal delivery timing. You can schedule your messages in relation to your webinar’s scheduled date, with four strategic timing options available:
Following timing selection, craft a compelling subject line and develop your message content. Click the Save button to finalize and implement your communication.
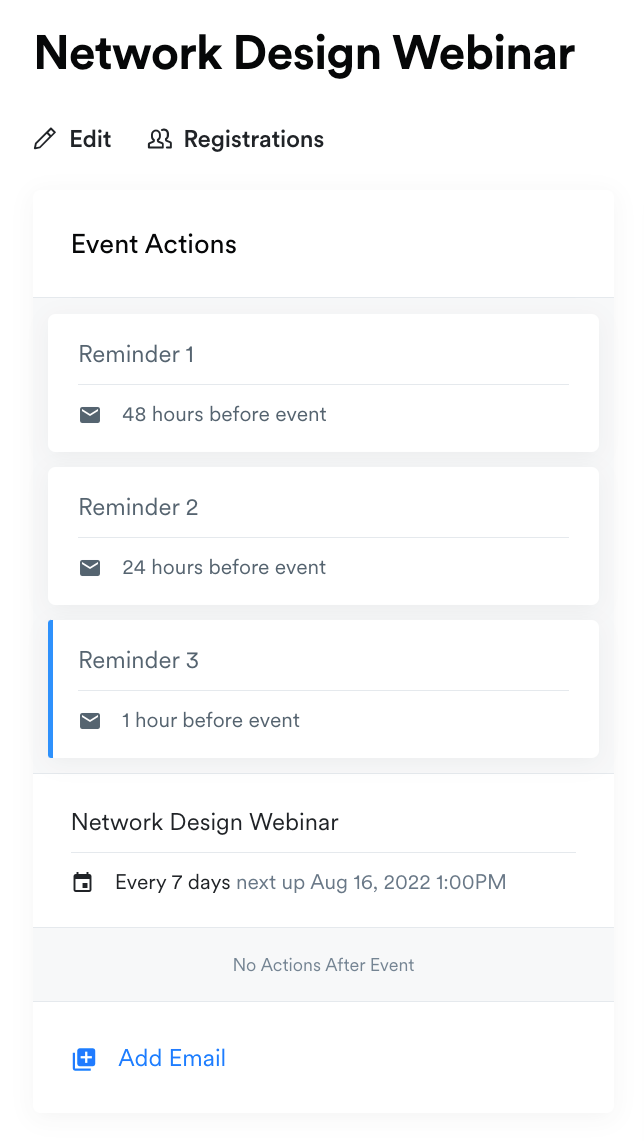
This procedure completes the email creation process within Kajabi’s event system. You can implement this sequence repeatedly to develop a comprehensive communication strategy with multiple touchpoints.
For instance, if your engagement strategy includes sending progressive reminder notifications to participants at specific intervals—such as 48 hours before your presentation, 24 hours prior to going live, and again just 1 hour before launching—you simply need to create three separate email communications with their respective timing parameters.
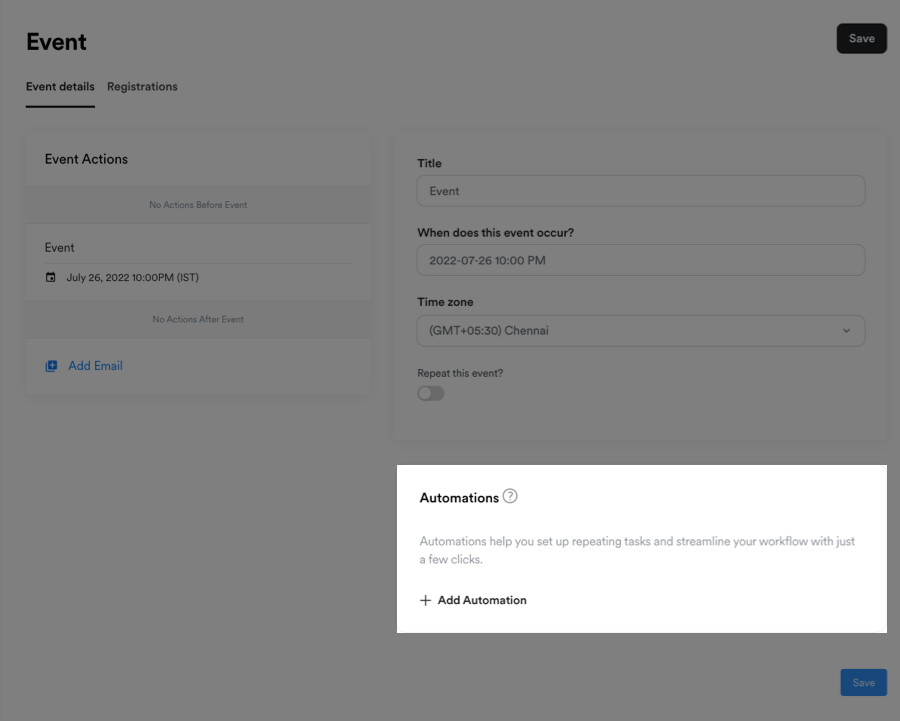
A particularly valuable element you’ll discover on the events page is Kajabi Automations. This feature enables you to establish automated workflows that perform specific actions related to your event.
For instance, you can automatically assign tags to participants or enroll them in email sequences when they sign up for your event.
Kajabi Funnels provide a streamlined approach to developing your webinar from beginning to end. You can configure all necessary elements through one central interface, including your event settings, landing pages, product offerings, and more.
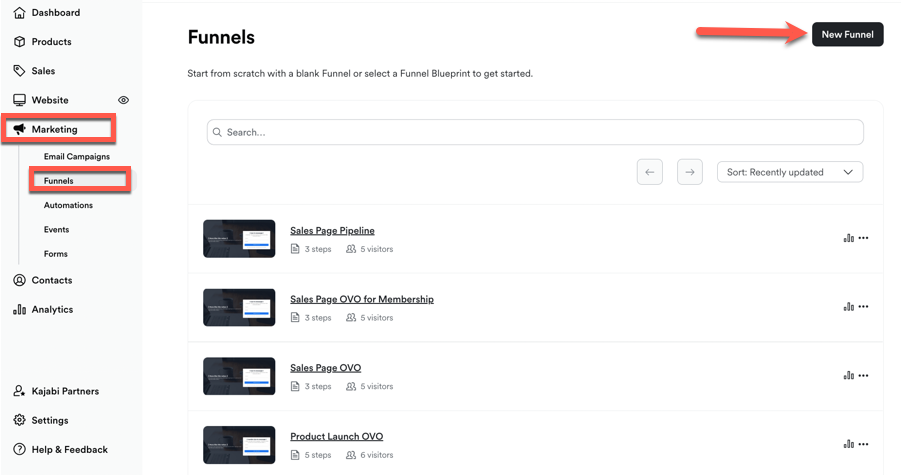
To establish your webinar, navigate to Funnels located within the Marketing tab.
Next, click on + New Funnel. This reveals various funnel templates, with a dedicated Zoom Webinar template among the options.
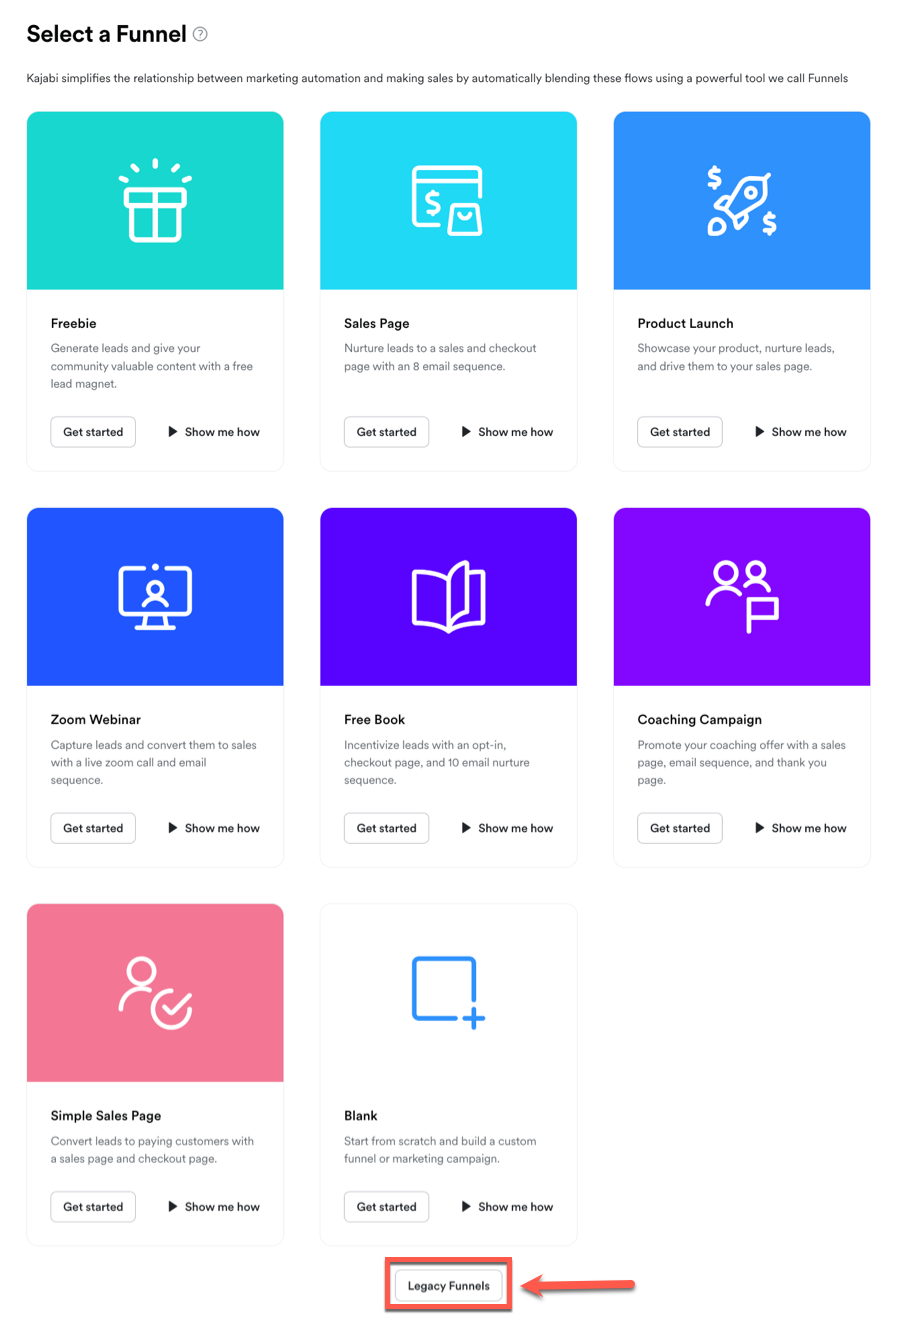
For our purposes, we’ll utilize one of the established legacy templates instead. To access these, select the Legacy Funnels option located at the bottom portion of the screen.
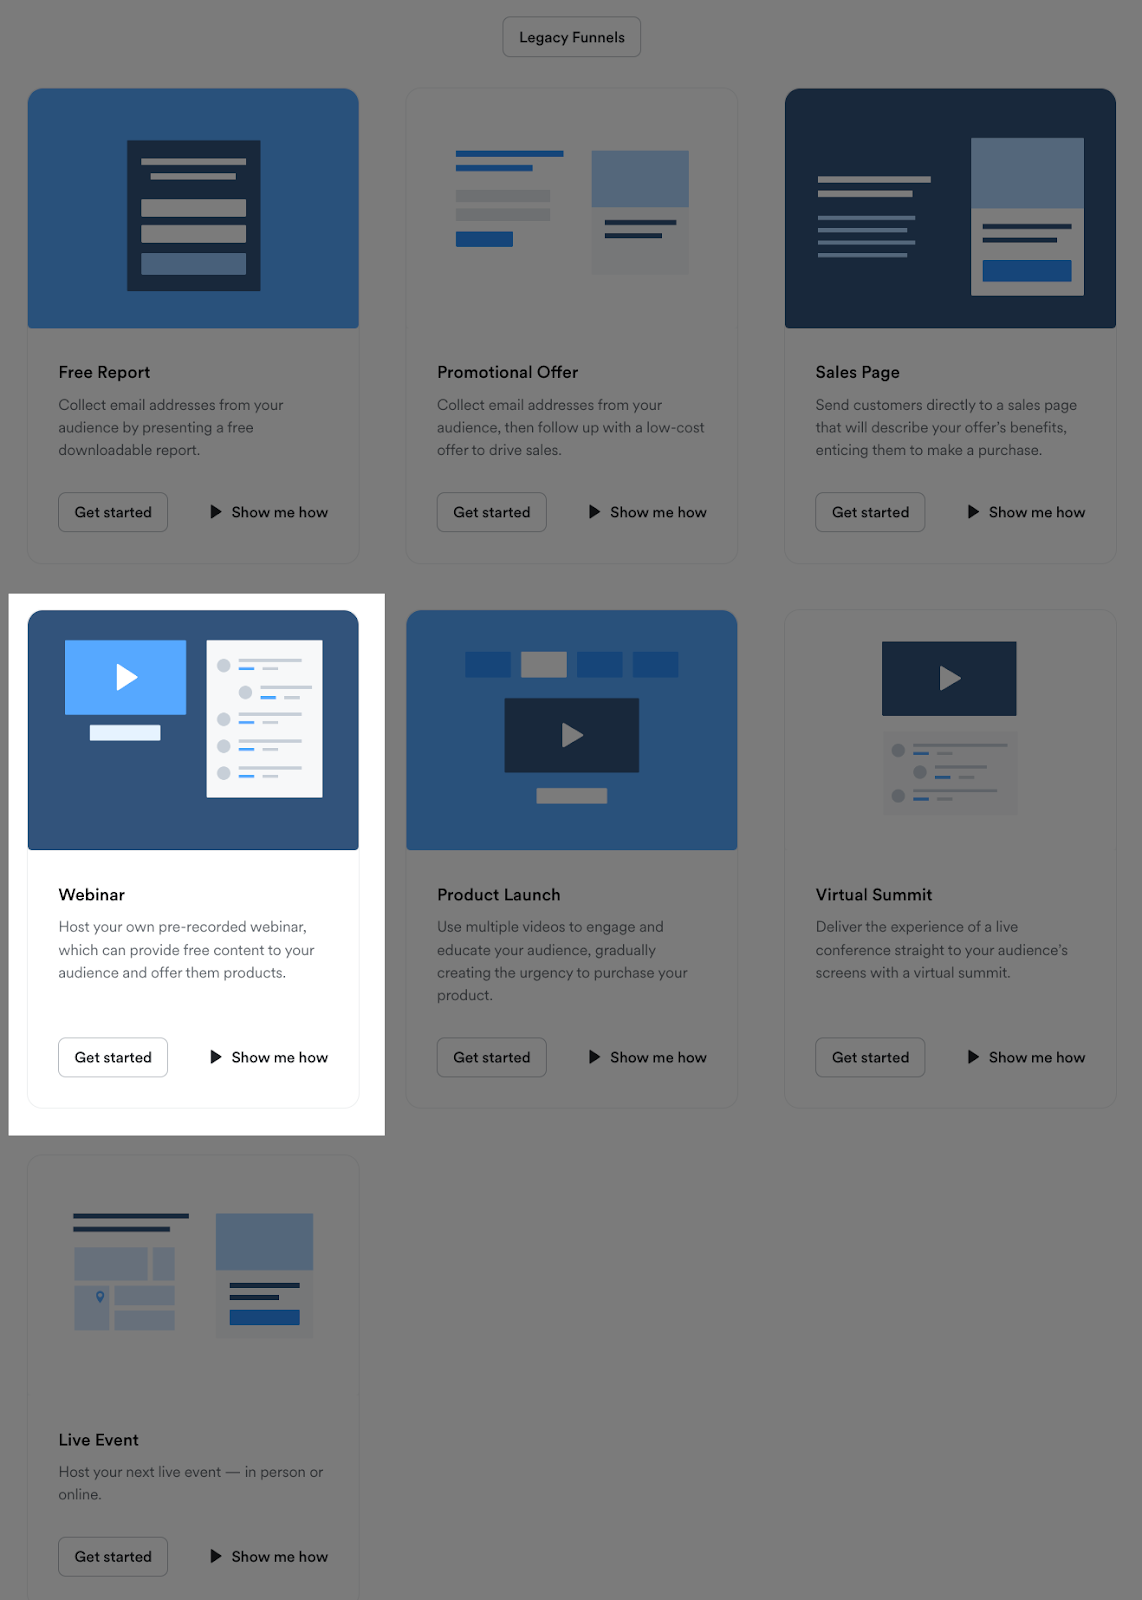
This action will display numerous additional template options. Choose the template labeled Webinar to create a comprehensive live event framework that connects your event with your product offerings and necessary pages.
During the following stage, Kajabi will prompt you to enter a name for your funnel, specify your webinar’s date and time, and determine whether your event will be live or prerecorded. This is also where you’ll identify which product or service you intend to promote during your webinar session.
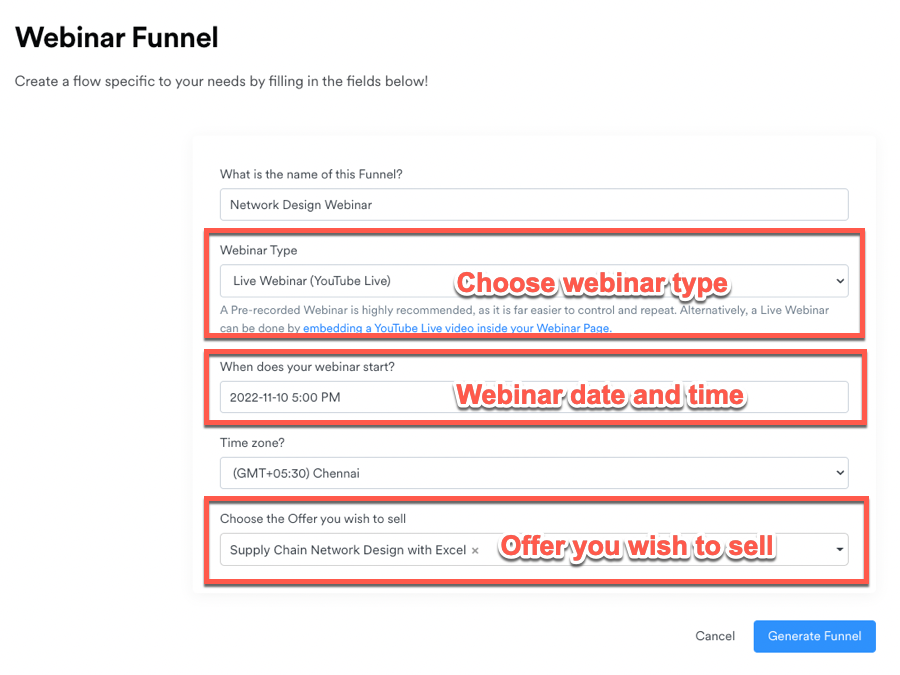
After selecting the Generate Funnel button, you’ll observe an automatically assembled funnel complete with all necessary components including a registration page, event configuration, confirmation page, webinar room interface, sales page, and checkout functionality.
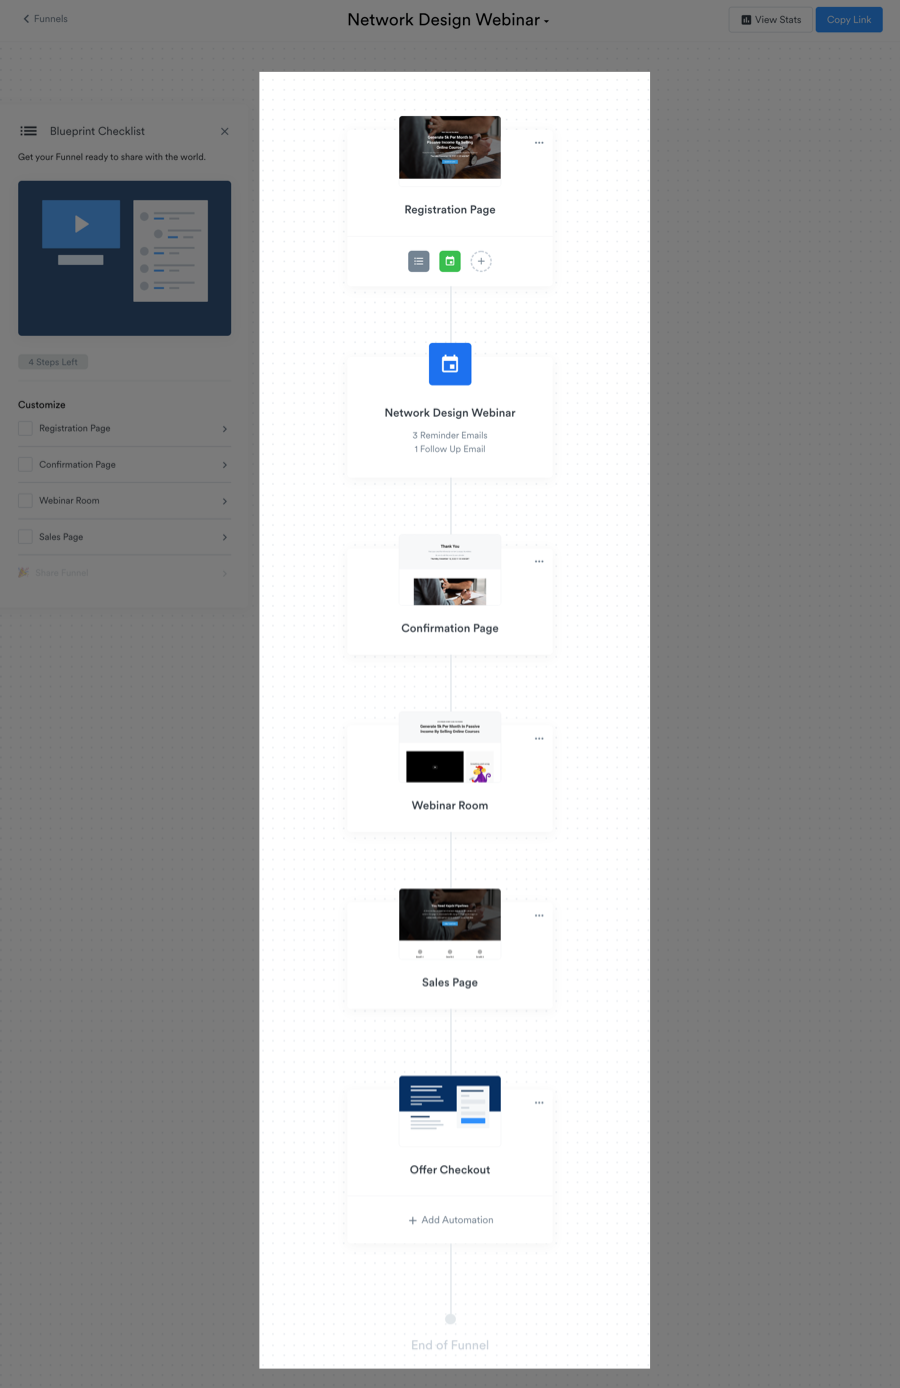
You have complete flexibility to modify any pages and components within your funnel according to your preferences. To make these adjustments, simply click on any element, and Kajabi will display the corresponding editor on the right side of your screen.
A particularly beneficial aspect of the funnel builder is that it integrates all relevant editing tools directly within the interface, allowing you to enhance and personalize each component without navigating away from the main builder environment.
Let’s now explore each individual component of your webinar funnel structure.The Registration page serves as the entry point where participants will sign up for your upcoming event and consent to receiving email communications containing updates and additional information.
The standard registration page in your funnel comes pre-equipped with all essential elements needed for an effective webinar landing page. You maintain the ability to refine any of these components, including textual content, action buttons, registration forms, and more.
Through the page builder functionality, you can incorporate additional sections or reconfigure the overall page structure.
To make adjustments to the registration page, select its icon within the funnel builder. This action launches the page builder interface, presenting a real-time preview of your page in the central area while displaying available sections and configuration options in the right-side panel.
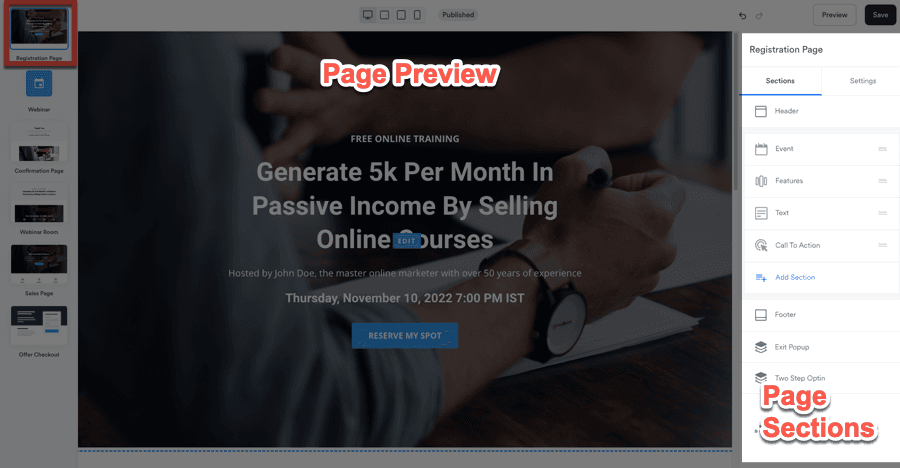
To adjust any specific component you wish to enhance, simply select it within the preview window, which will immediately reveal a collection of customization options in the right panel.
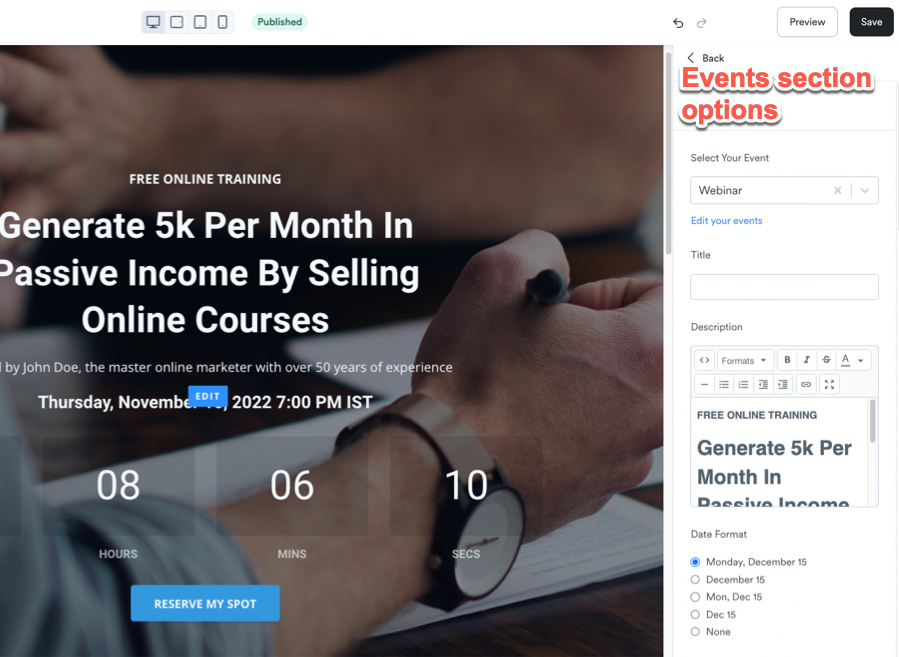
As an illustration, when you select the upper Event section displayed on your page, you’ll gain access to numerous configuration possibilities including choosing an alternative event, updating headings and descriptive text, customizing button appearance, enabling a countdown timer display, and various other enhancements.
Following the same approach, you can enhance additional page sections as needed. When you wish to incorporate a new section, select the Add Section function in the right-side panel, which provides access to numerous pre-designed section templates for your selection.
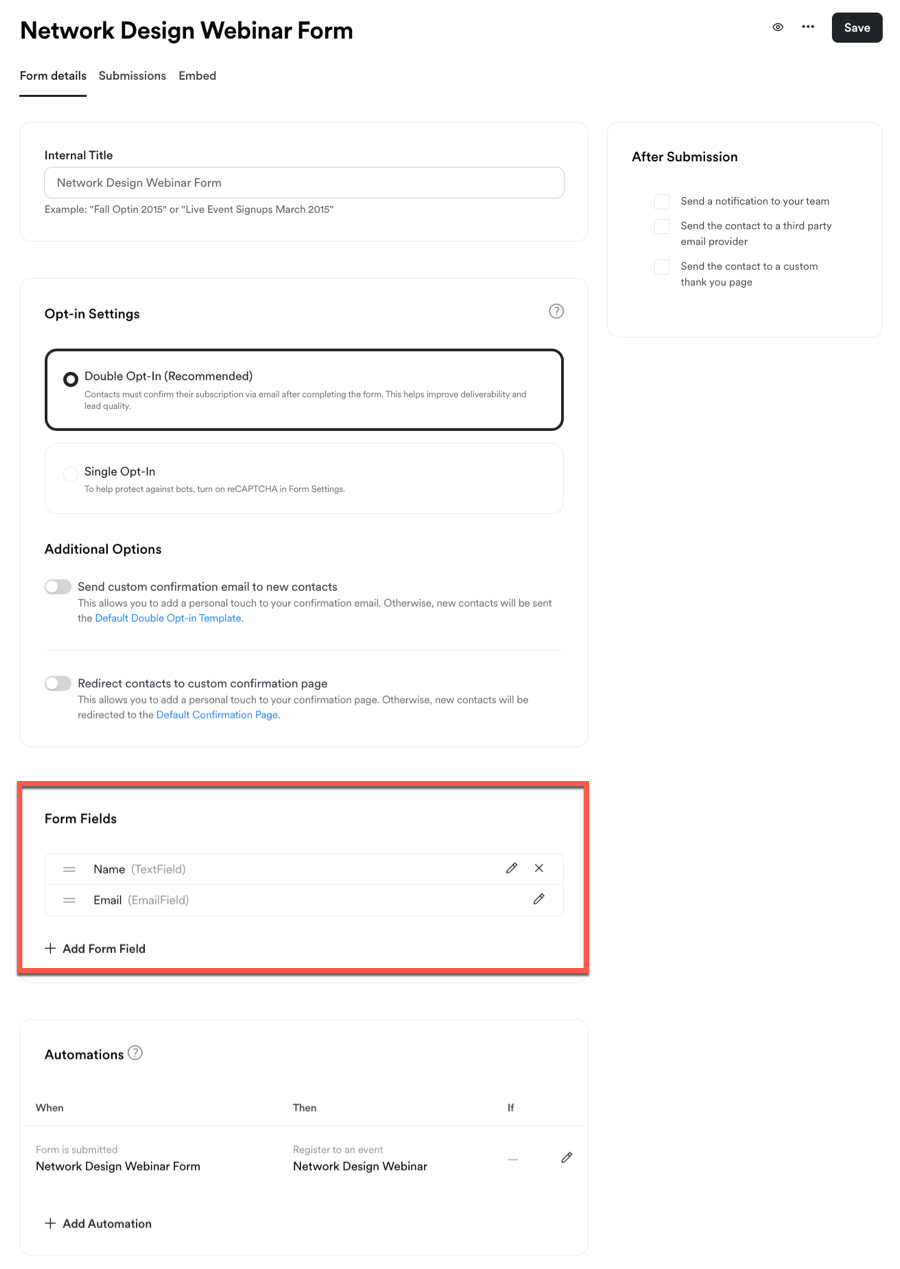
After completing your page customizations, the next step involves configuring your form settings. To access these options, return to the main funnel builder interface and click the small menu icon positioned directly beneath the registration page element.

This action will launch the form configuration interface where you can personalize your registration form elements.
Within this section, you’ll discover settings for selecting between single or double opt-in methods, customizing confirmation emails, managing form fields, setting up automated workflows, and more.
The Form Fields area allows you to determine exactly what participant information you wish to gather during registration. For instance, if collecting mobile phone numbers is important for your follow-up strategy, you can establish a new field here that will automatically be integrated into your registration form.
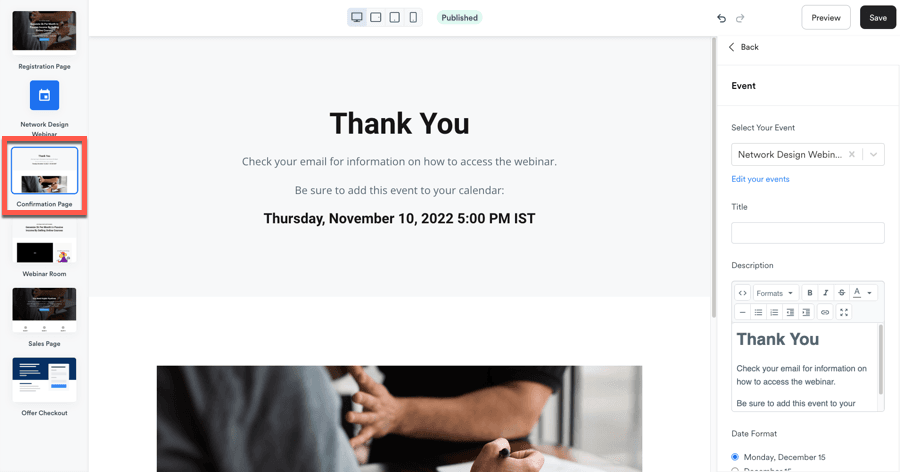
The Confirmation Page serves as the destination your attendees will view after successfully registering for the event. This straightforward page displays a verification message, and you can customize it using the same method you utilized when modifying the Registration Page.
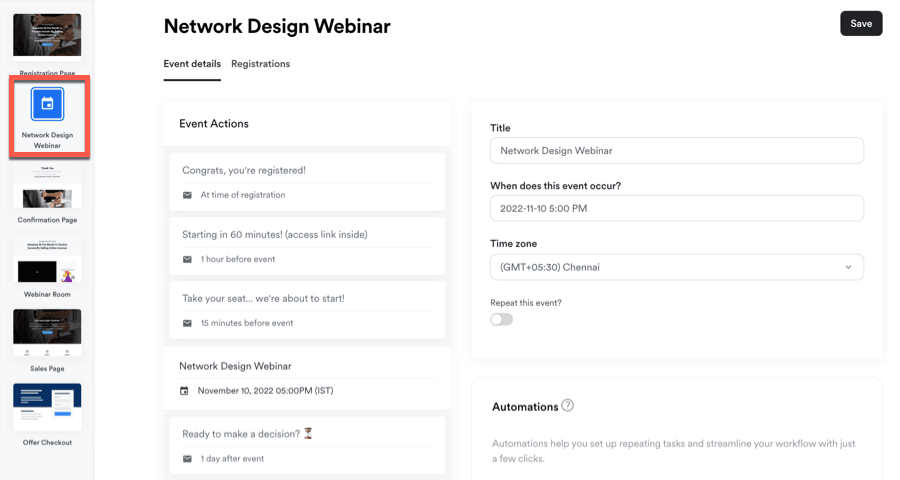
Your next funnel phase involves the event automatically generated by Kajabi during your funnel setup process. Selecting this element will launch the identical Events dashboard that we previously guided you through earlier in this guide.
Within this section, you have the ability to modify your event particulars, including the name, schedule information, participant communications, and other relevant details.
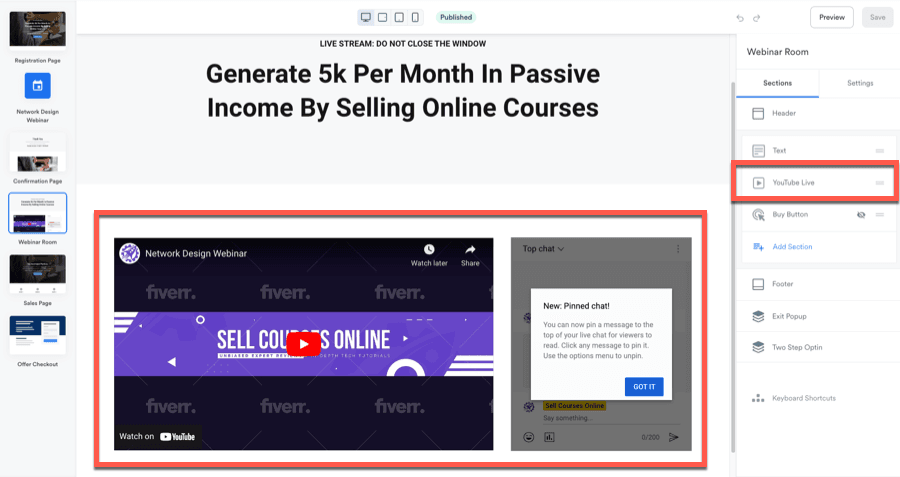
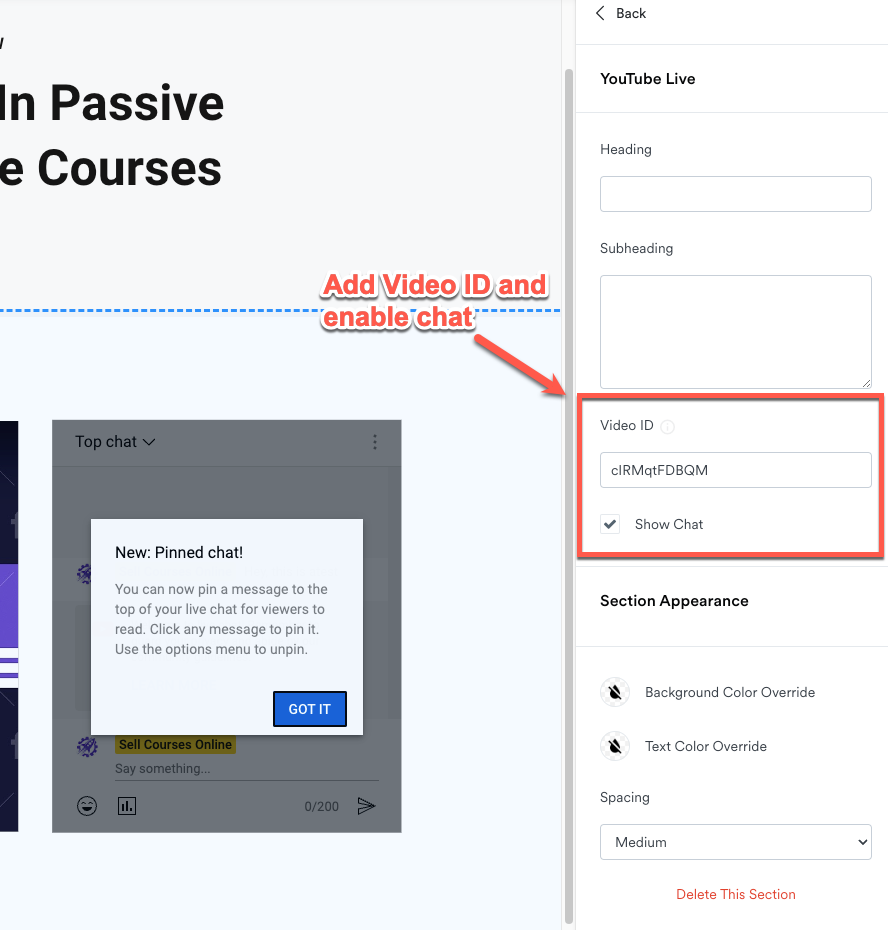
Webinar Room functions as the virtual space where your participants will view your live presentation, requiring you to incorporate your YouTube Live broadcast onto this interface.
As noted earlier, Kajabi does not offer built-in streaming functionality, making the complimentary
YouTube Live feature your most effective solution.
To implement this, create and schedule a YouTube Live session and extract the video identifier. Next, navigate to the YouTube Live component on your page and insert the ID.
Furthermore, you have the option to incorporate a YouTube Live discussion panel within the page.
For those unfamiliar with YouTube Live configuration procedures, explore this comprehensive guide for additional instructions.
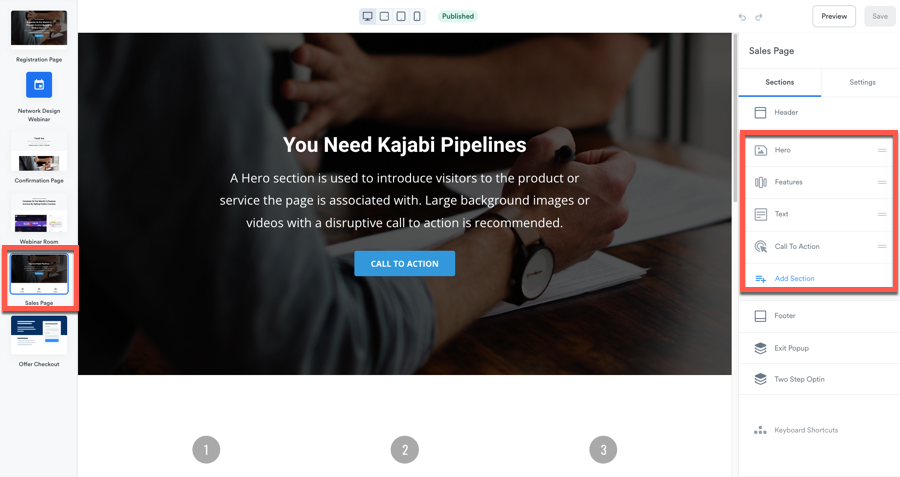
Upon conclusion of your webinar, you’ll guide your attendees to a dedicated sales landing page. This platform allows you to emphasize your presentation’s key insights and provide participants the opportunity to enroll in your offering. This could encompass an educational digital course, a premium membership community, or personalized coaching services.
The standard funnel sales page incorporates essential components including the Hero banner, value propositions and advantages, persuasive action prompts, and additional elements. Similar to other pages within your funnel, you maintain complete flexibility to tailor this sales interface to your specific requirements.
This demonstrates the process for modifying the various components within your webinar marketing sequence. You maintain the flexibility to remove existing elements and incorporate new stages into your funnel structure.
For instance, when offering a premium webinar experience, you could substitute the standard registration interface with a compelling sales page followed by a transaction portal. Subsequently, you have the capability to implement an automated workflow that instantly enrolls purchasers into your scheduled event.

Once you’ve customized your funnel to meet your specifications, you can encourage participation in your webinar by selecting the Copy Link option located at the top portion of your display.
This unique web address will direct potential attendees to your webinar registration interface, and your automated funnel system will handle all subsequent processes.
Establishing a pre-recorded presentation in Kajabi follows largely the same framework as configuring a live broadcast. You’ll simply need to address these two specific modifications in your approach:
All other aspects of the implementation procedure remain consistent with the standard process.
Throughout this guide, we’ve explored the functionality of Kajabi Events and demonstrated how to leverage this feature to develop effective webinars for your digital enterprise.
We’ve additionally walked through the comprehensive funnel development process that integrates all webinar components to create a fluid and intuitive experience for your audience members.
Given Kajabi’s remarkable achievement in streamlining the entire webinar funnel creation workflow, even those new to the platform will find themselves confidently establishing their inaugural webinar presentation.
We trust this resource has enhanced your comprehension of Kajabi’s webinar capabilities. If you haven’t yet adopted Kajabi as your platform of choice, consider registering for a complimentary trial period to begin crafting your webinar presentations.
Should you require additional clarification on specific aspects or have further inquiries, please share your thoughts with us by contributing a comment below.
Kajabi allows you to schedule events and create end-to-end webinar funnels. However, it doesn’t have a native broadcasting feature, so you’ll need to use YouTube Live or Zoom for live streaming.
Yes, Kajabi works with Zoom. You’ll first need to create a Zoom Webinar funnel. Then, you’ll set up a webinar in Zoom and use the meeting URL in your webinar funnel.
Events is a feature that allows you to create one-time or recurring events in Kajabi. With this, you can set a time and date for your event and also create reminder and follow-up emails.
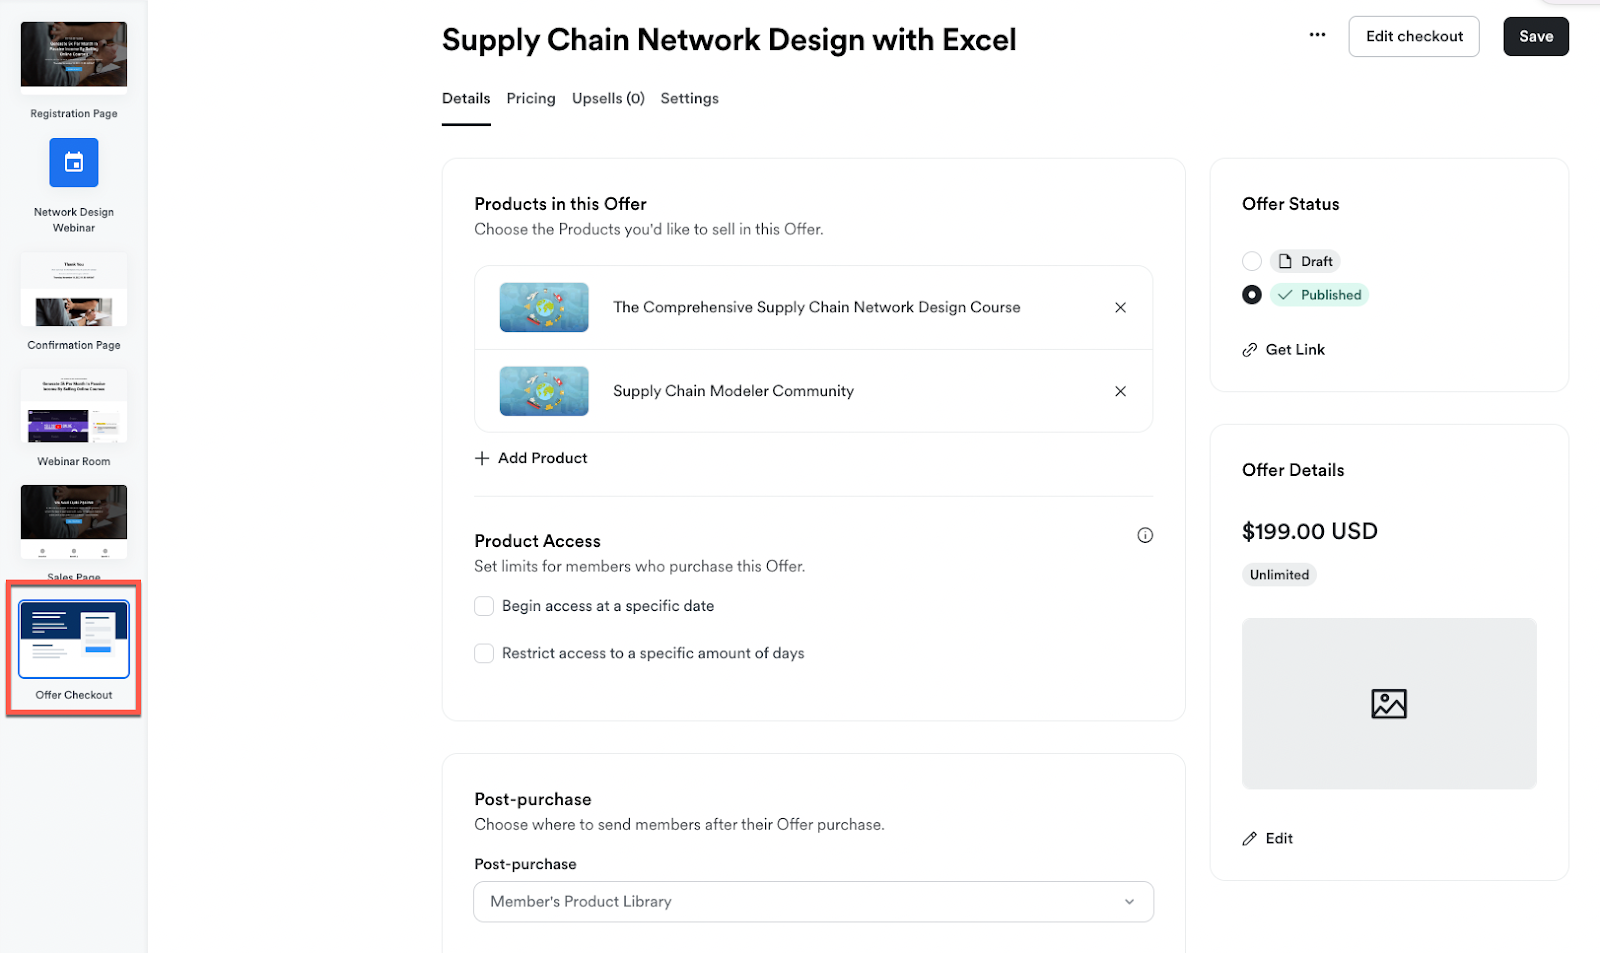
If you want to sell an event on Kajabi, you must first create an offer for it. Then using Kajabi Automations, you can automatically register anyone who purchases the offer for the event.

Daniel NicFounder, SellingOnliceCoursesGuide.comis an entrepreneur and digital education specialist who founded sellingonlinecoursesguide.com, a platform dedicated to helping creators and educators successfully navigate the online course marketplace. Through his website, he shares insights and strategies for developing, marketing, and monetizing online educational content. His work focuses on empowering course creators to build sustainable online businesses while effectively sharing their knowledge with students worldwide.
Daniel Nic is an entrepreneur and digital education specialist who founded sellingonlinecoursesguide.com, a platform dedicated to helping creators and educators successfully navigate the online course marketplace. Through his website, he shares insights and strategies for developing, marketing, and monetizing online educational content. His work focuses on empowering course creators to build sustainable online businesses while effectively sharing their knowledge with students worldwide.

We respect your privacy and will never spam you.


