We earn a commission from partner links on this site. This doesn’t affect our opinions or evaluations.
Updated on
If you’ve landed on this page, chances are you’re either an active Circle.so (commonly known as Circle) user, or you’re exploring it as a potential platform for your community.
You’re likely curious about Circle.so Workflows and have questions like What exactly is this feature? How do you set up a workflow? In what ways can workflows enhance your community experience?
To address these inquiries, we’ve developed this detailed exploration of Circle’s Workflows functionality. Throughout this guide, we’ll examine the feature’s core purpose, its operational mechanics, practical application scenarios, and additional insights.
Let’s dive right in!
Circle Workflows functions as a sophisticated community management solution that automates routine tasks to streamline administration, create customized member journeys, and expand your community while conserving valuable time and resources.
The platform offers two distinct workflow categories—Automation and Bulk Action.
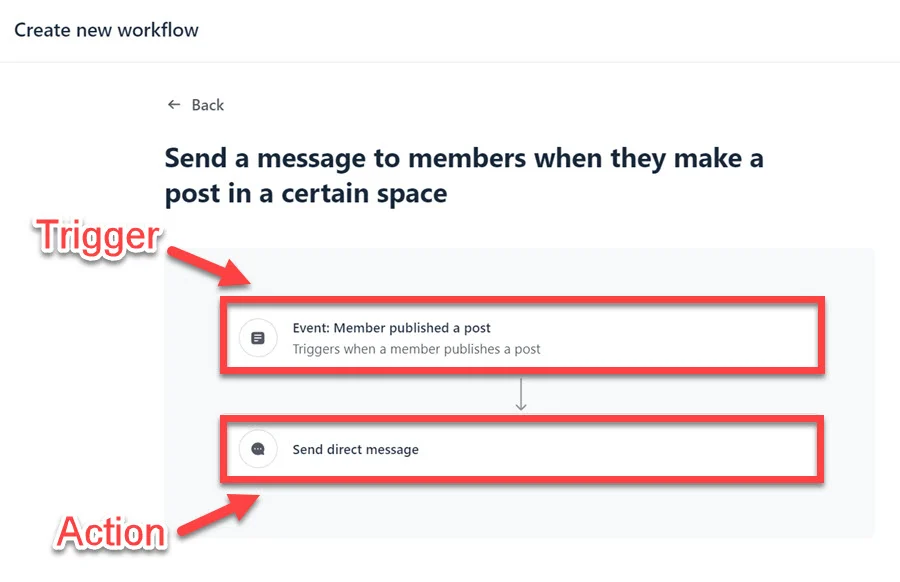
An automation workflow enables you to systematize specific community responsibilities through triggers and corresponding actions. These operate essentially as “if-this-then-that” sequences, where a trigger represents a particular event (for instance, when someone becomes a community member), and an action serves as the system’s response (such as delivering them a welcome message).
Consider these practical automation examples you can implement within Circle:
Bulk actions serve as efficiency tools that allow simultaneous operations across multiple member profiles at once. You can additionally schedule future implementations and establish recurring actions to maximize productivity.
When using bulk actions, you gain the ability to precisely define member segments through customizable filters. This targeted approach enables various administrative functions including tag management, email communications, and subscription adjustments.
Circle distinguishes itself as the sole leading community platform providing comprehensive Workflow capabilities. From streamlining administrative tasks to enhancing engagement strategies, this feature empowers you to accomplish more with reduced manual intervention.
The important consideration to note is that Workflows represents a premium functionality exclusively available with Business or Enterprise subscription tiers.
Now, shall we collaborate on creating your initial workflow?
Prior to workflow creation, verify that you possess an active Circle account with an established community. If you’re new to the platform, our comprehensive Circle implementation guide provides step-by-step instructions.
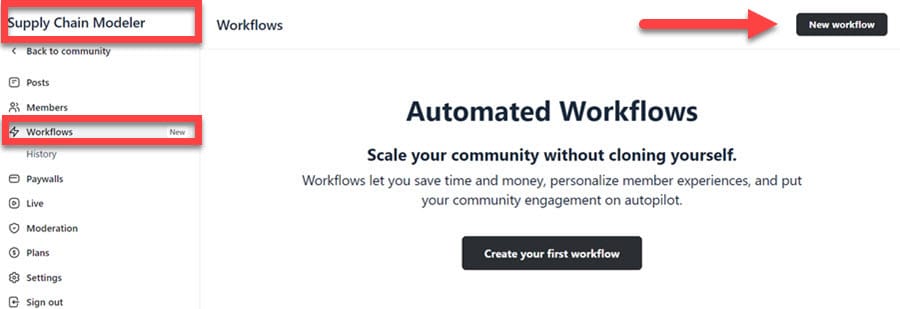
For those already familiar with Circle’s interface, workflow configuration proves remarkably simple. Begin by selecting your community name located in the upper left corner of the interface, then navigate to the Workflows option.
From this dashboard, initiate your first workflow by clicking the New Workflow button positioned in the top right section of your screen.
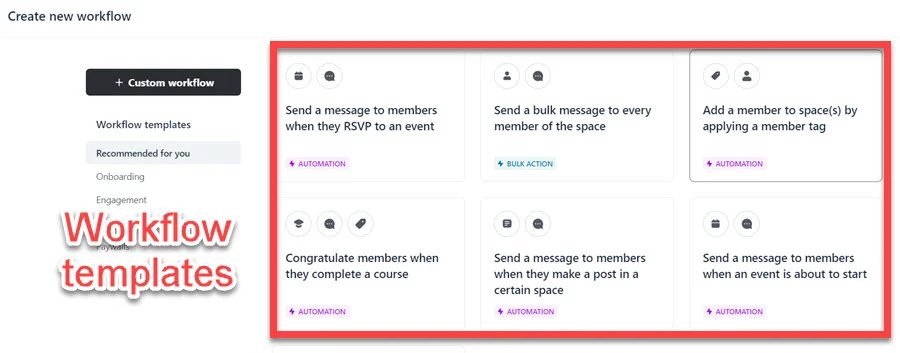
This action launches a new interface displaying ready-to-use workflow templates. You have the flexibility to either select a pre-designed template or build your custom workflow from the ground up.
You’ll observe that each template features a distinctive designation—either automation or bulk action. As previously explained, these represent two fundamentally different workflow categories.
The automation option proves ideal when developing workflows that monitor specific events and execute corresponding actions in response. Conversely, bulk actions facilitate immediate task execution or scheduled implementation without requiring triggering events.
Although the provided workflow templates certainly streamline your process, for this demonstration we’ll construct a custom workflow together to provide you with deeper insights into the functionality of this powerful feature.
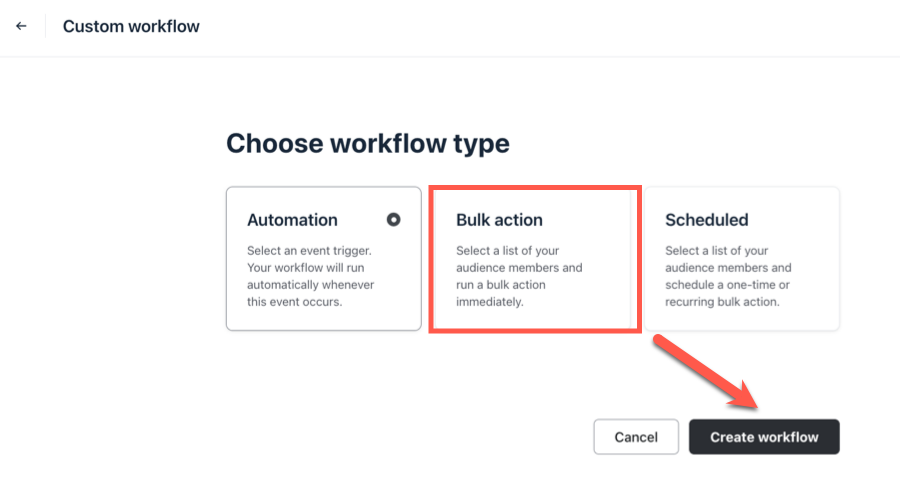
To initiate your personalized workflow, select the Custom Workflow option and then choose Automation from the subsequent menu.

This selection activates the workflow editor interface, where you’ll configure both trigger events and resulting actions.
Circle offers numerous trigger options, with these representing some of the most frequently utilized:
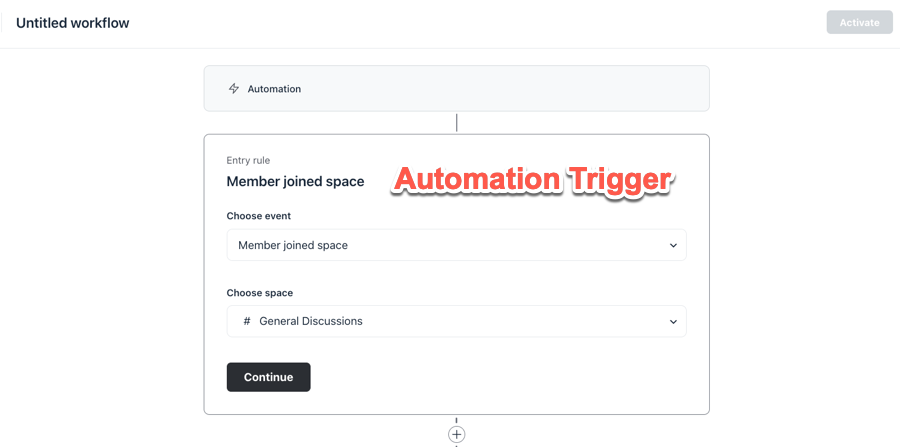
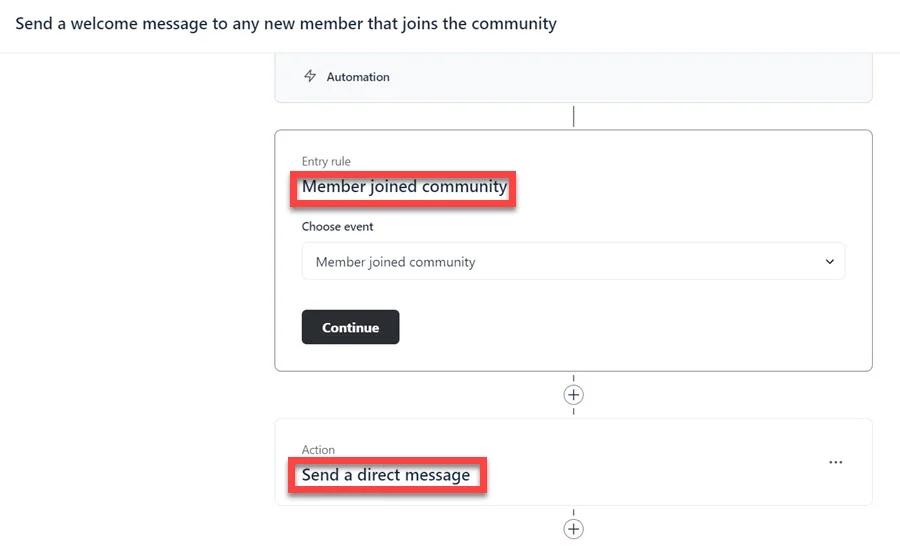
Since our objective involves sending welcome communications when members join particular spaces, we’ll designate Member joined space as our automation trigger. Additionally, ensure you specify the exact space where this trigger should activate.
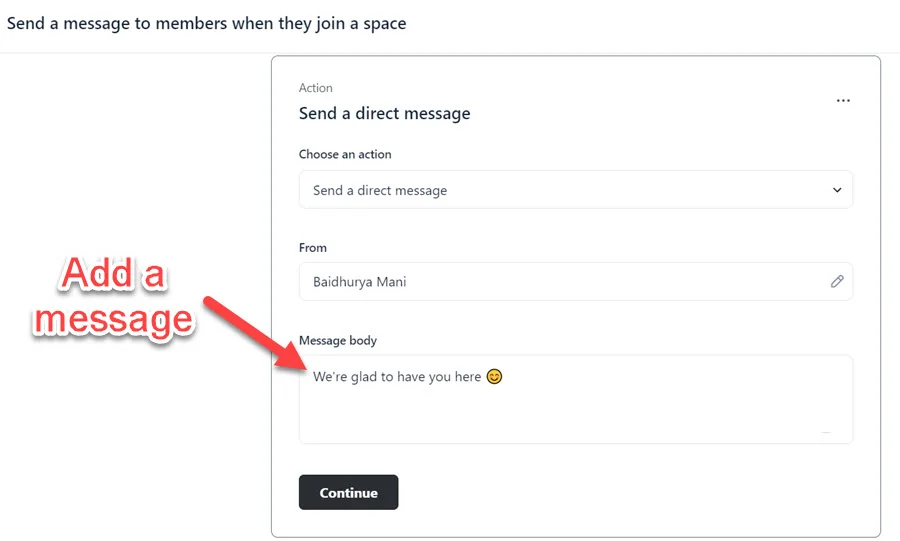
Following trigger configuration, you’ll need to determine the appropriate response when members enter your designated space. For our demonstration, we want to implement automated message delivery.
To establish this action, select Add an action, then choose Send a direct message, and proceed to craft your personalized message content in the provided composition field.
Circle provides numerous automation capabilities, with these being the most frequently utilized:
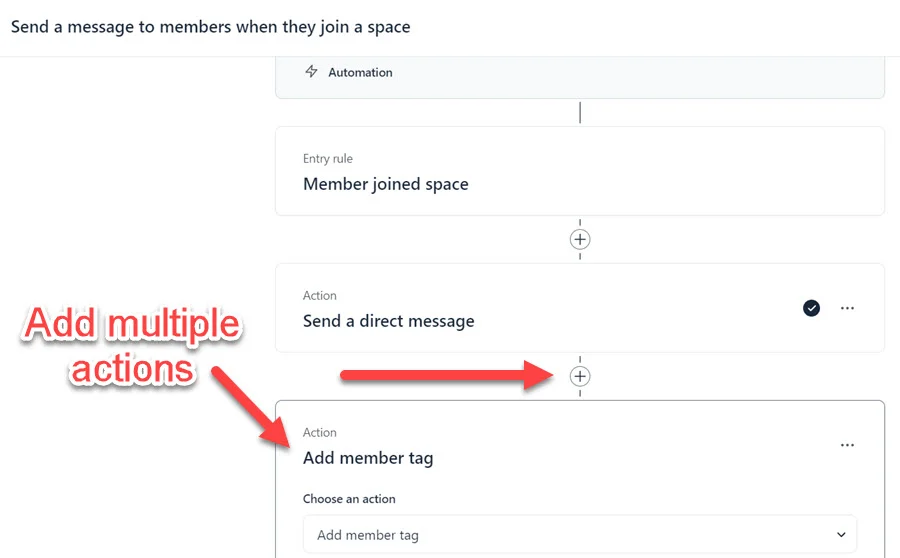
Additionally, you have the ability to integrate several actions within a single workflow. For instance, in our earlier example, when someone becomes part of a specific space, you can automatically dispatch a greeting message while simultaneously applying a tag to their profile.
To implement this functionality, simply activate the Plus symbol positioned beneath the initial action container and choose your preferred action.
After completing your workflow configuration, remember to engage the Activate function located in the upper right section of your display.
Now, we’ll briefly demonstrate how to establish a bulk action workflow for communicating with participants who have expressed interest in joining a specific event.
Execute the identical procedures as previously outlined, but this time select the Bulk Action alternative.
When creating bulk action workflows, you must first categorize your audience before determining your intended actions.
Circle offers numerous filtering options to help you accurately identify your target audience segment. You can refine your audience selection using various parameters, including membership roles, space participation, assigned tags, event attendance, engagement metrics, most recent platform access, and more.
In this illustration, we’ll implement both the membership role filter and an events filter, then identify the specific event we’re focusing on.

Next, within the Action container below, again opt for Send a direct message and complete both the From and Message Body sections.
The final step involves initiating your workflow by selecting the Run Now button positioned in the upper right corner of your interface.
Let’s now explore how to establish a scheduled workflow.
Generate another workflow but this time choose the Scheduled option in the custom workflow panel.
Scheduled workflows function identically to bulk actions, so employ the same process to specify the group of members you wish to reach and select your desired action.
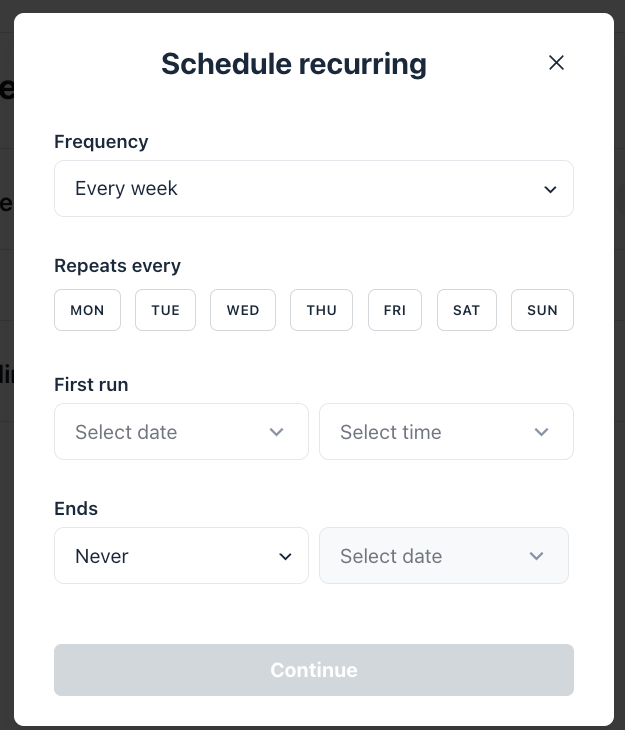
Finally, click the Schedule button and decide between one-time execution or recurring implementation.
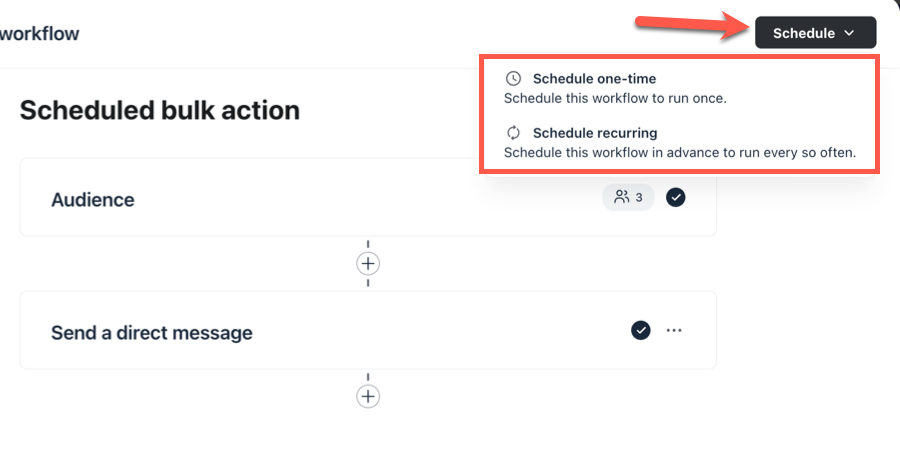
When configuring single-instance activities, merely specify your preferred date and time to arrange the task.
For ongoing operations, you have the flexibility to determine the interval pattern (such as daily, weekly, or monthly) and establish both commencement and conclusion dates for the activity.

You have additional options to extend functionality—you can incorporate more actions:
Another illustration of a productive workflow is to categorize members according to their interaction patterns, which enables you to segment your audience and deliver them content and offers that will genuinely resonate with their interests.
For this workflow, the trigger will be Member liked a post, and you simply need to identify the specific post for which you want to monitor member engagement.
To illustrate this concept more concretely, imagine you have published a post previewing an upcoming educational program. You can implement this workflow to label all participants who express interest through likes and deliver them customized communications and materials promoting the program.
Workflows can additionally serve as a dynamic engagement mechanism for your Circle courses. You can acknowledge and celebrate your students’ accomplishments.
Conveniently, there exists a ready-made template available for this purpose.
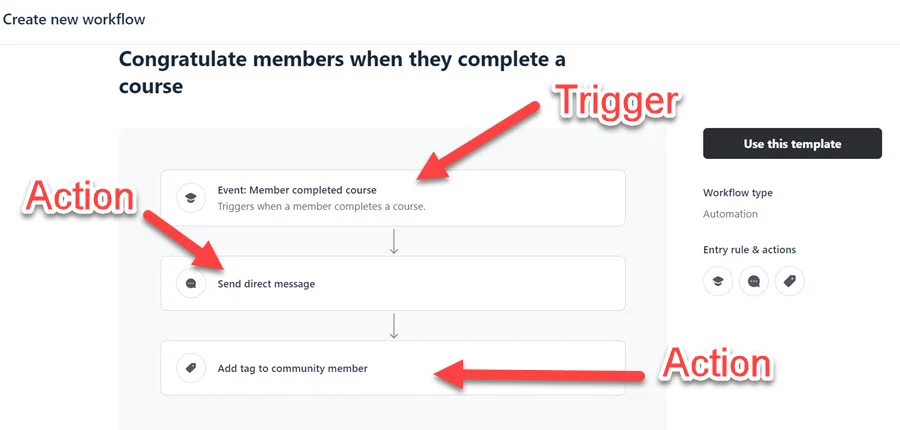
You’ll discover the Congratulate members when they complete a course template within the Engagement section.
You’ll observe that this template comprises one trigger and two corresponding actions, specifically, when a participant finishes a course (trigger), you can send them a personal message (action 1) and assign a participant tag (action 2).
Your communication can range from a straightforward congratulatory note to expressing appreciation for members’ involvement in your community.
And with participant tags, you’ll maintain a roster of all members who successfully completed a specific course. You can provide them with a certificate of completion or offer a promotional code for an additional course. The possibilities are virtually endless.
Circle provides three workflows associated with events, two functioning as Automations, and one operating as a bulk action.

You can utilize the second template—Send a message to members when an event is about to start—to effortlessly accomplish this.
This represents just a portion of what’s possible:
Maintaining communication with your members and ensuring they extract maximum benefit from your community is crucial. But how do you address those who have become inactive?
Circle enables you to filter your audience according to their last login date, allowing you to implement a bulk action to contact them directly and encourage their return. Additionally, you can transmit a push notification to their mobile devices if they have installed the Circle app.
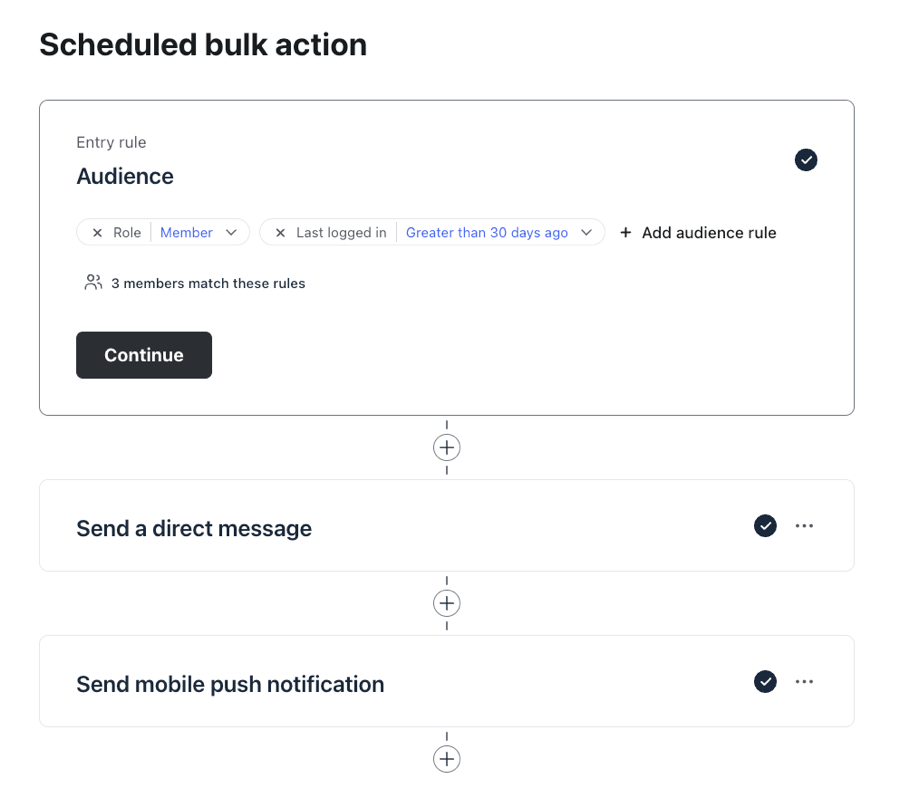
Furthermore, you can establish this as a repeating operation, enabling you to systematically reach out to dormant members and motivate them to resume participation.
You can additionally implement workflows to reduce time spent on repetitive administrative functions, and in this instance we’ll examine transferring members from one area to another.
To accomplish this, you can employ Circle’s bulk action template, Duplicate members from one space to another.
Upon accessing the template, you’ll find the functionality to establish audience parameters and designate the space from which you wish to transfer members.
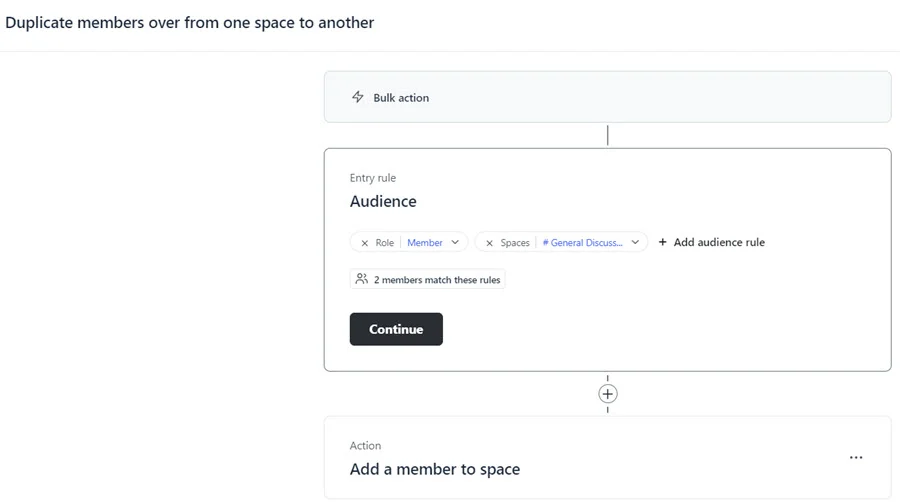
The audience selection will automatically have your participants filtered by role. Your intention is to transfer regular members, not moderators and administrators.
You should then identify the space from which you intend to replicate members and incorporate any additional audience criteria to refine your selection.
For instance, you can transfer all members from a designated space who possess a specific member designation.
Subsequently, in the action panel, you should specify the destination space where you wish to relocate members, and the process is complete!
In summary, Circle.so Workflows represents a multifunctional tool that can be utilized for minimizing manual tasks, while also enhancing communication with your participants and developing more individualized experiences for them.
Throughout this guide, we’ve explored the fundamentals of Workflows, including implementation methods and several practical applications you can implement within your own community.
If you haven’t yet registered for Circle, you can begin a 14-day complimentary trial (without credit card requirement) to start utilizing Workflows.
To incorporate a fresh segment, select the Add Section option. Thinkific provides more than 20 distinct section templates for your selection.
You can implement these to emphasize membership advantages, present client reviews and endorsements, exhibit pricing structures, respond to common inquiries, display a countdown clock, and more.
Circle Workflows allows you to create trigger-based actions to automate tasks in your community. Additionally, you can create Bulk Actions, which allow you to perform an action with multiple members at once.
Workflows allow you to send event reminders, message new community members, move them from one space to another, assign tags to members who add a post to a space, purchase a subscription, like a post, and much more.
Automations need an event to trigger an action, whereas Bulk Actions allow you to perform immediate or scheduled actions on a segment of your members.
The Workflows feature is available on the Business and Enterprise plans. On the Business plan, you can have 20 simultaneous automations, 20 bulk actions, and 20 scheduled actions per month, while on the Enterprise plan, there’s no limit on the number of workflows you can have.

Daniel NicFounder, SellingOnliceCoursesGuide.comis an entrepreneur and digital education specialist who founded sellingonlinecoursesguide.com, a platform dedicated to helping creators and educators successfully navigate the online course marketplace. Through his website, he shares insights and strategies for developing, marketing, and monetizing online educational content. His work focuses on empowering course creators to build sustainable online businesses while effectively sharing their knowledge with students worldwide.
Daniel Nic is an entrepreneur and digital education specialist who founded sellingonlinecoursesguide.com, a platform dedicated to helping creators and educators successfully navigate the online course marketplace. Through his website, he shares insights and strategies for developing, marketing, and monetizing online educational content. His work focuses on empowering course creators to build sustainable online businesses while effectively sharing their knowledge with students worldwide.

We respect your privacy and will never spam you.


