We earn a commission from partner links on this site. This doesn’t affect our opinions or evaluations.
Circle.so stands among the premier platforms for building digital communities. Its user-friendly interface provides all the essential tools needed to cultivate a vibrant online community environment.
For those focused on educational content, Circle offers the ability to seamlessly integrate courses within your community structure.
This comprehensive guide explores the Circle.so Courses functionality and its complete range of capabilities. To facilitate your course creation journey, we’ve developed a detailed walkthrough with step-by-step instructions.
Ready to discover everything Circle courses has to offer? Let’s begin.
Circle Courses functions as a comprehensive solution for creating and distributing online educational content.
This powerful feature enables you to host your instructional materials, structure them into organized modules and lessons, and deliver them to learners through both the web-based course interface and Circle’s dedicated mobile applications.

It’s essential to understand that the learning experience within Circle differs significantly from traditional online course platforms.
The platform employs a community-centered philosophy, positioning your online community as the foundation of the member experience. When participants enroll in your educational program, they initially become part of your community ecosystem before accessing course materials.
Consequently, Circle might not represent the ideal solution if you’re seeking a platform exclusively dedicated to course sales. However, it excels remarkably in specific contexts:
With this foundational understanding established, let’s examine the capabilities of this feature in greater depth.
Circle incorporates numerous functionalities to support the creation, hosting, and delivery of comprehensive online learning experiences.
The intuitive course construction interface proves remarkably user-friendly, enabling swift establishment of your instructional framework with organized sections and lessons.
You have the flexibility to segment your educational content into distinct sections while nesting individual lessons within each structural component.

The course development interface features intuitive drag-and-drop capabilities, allowing instructors to effortlessly rearrange lessons and sections to optimize their curriculum structure.
Circle’s platform simplifies content creation within your lessons. The versatile editor supports rich text formatting, visual elements, multimedia components, document uploads, and embedded content from external sources.
Additionally, Circle’s innovative AI assistant—content co-pilot—integrates directly into the lesson editor, enabling streamlined creation and refinement of text-based instructional materials.
Furthermore, Circle manages all content hosting requirements, allowing direct upload of videos and other media files directly to their platform infrastructure.
Regarding learning delivery and engagement tools, Circle incorporates scheduled content release functionality. This progressive disclosure feature enables instructors to unveil sections according to specific calendar dates or customized timeframes following individual student enrollment.

The platform also implements sequential progression requirements, mandating that participants complete each instructional segment prior to advancing to subsequent content. Additionally, there exists functionality for video completion verification, requiring learners to view at least 90% of video content before proceeding further.
Despite these capabilities, several crucial educational tools remain absent from Circle’s course delivery system. Notable omissions include assessment creation, assignment submission functionality, and credential issuance options.
As a counterbalance to these limitations, Circle allows seamless integration of community features within your educational offerings, making it particularly suitable for cohort-based learning programs.
This integration capability enables you to incorporate dedicated discussion forums, event scheduling spaces, or group messaging channels alongside your course content, fostering interactive and collaborative learning environments.
Regarding learner experience, the course interface features user-friendly navigation, providing students with straightforward access to lesson content while simplifying movement throughout the curriculum structure.

Furthermore, participants can access educational content through Circle’s dedicated mobile application, contributing to enhanced engagement metrics and improved course completion statistics. The platform also provides instructor visibility into learner advancement, though the analytics and reporting capabilities remain relatively fundamental.
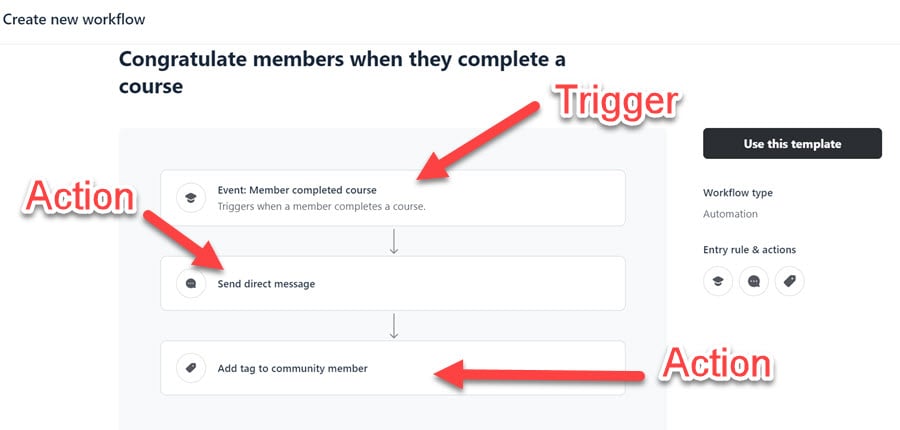
A particularly noteworthy functionality is Circle Workflows. While not specifically designed for course creation purposes, this feature can significantly enhance participant engagement through automated sequences—such as delivering personalized welcome communications or generating congratulatory messages upon course milestone achievement.

In summary, Circle provides a robust array of functionalities for developing educational content and fostering member interaction, making it particularly well-suited for community-integrated learning experiences.
The Courses capability comes included with Circle’s Professional subscription tier ($99/month) and higher-level plans. While no explicit constraints exist regarding course quantity, limitations may apply based on the space allowances of your selected subscription.
Importantly, the platform offers flexibility beyond its native course development tools. Through Circle’s Single Sign-On integration options, you can seamlessly connect with established learning management systems like Thinkific and Teachable.
Let’s now explore the practical process of establishing an educational program within the Circle platform.
To begin this process, you must first establish a community environment where your course will reside. Navigate to your desired space group, position your cursor over it until the Plus icon appears, then select the Add Space option from the dropdown menu.

This action will trigger a dialog window displaying various space type options for your selection. For this specific purpose, you should identify and choose the Course option.

The following stage requires you to determine your preferred course delivery model from three available options—self-paced, structured, or scheduled learning experiences.
Structured and scheduled variants essentially represent different content release methodologies. With structured courses, modules become accessible at predetermined intervals following individual enrollment dates. Alternatively, scheduled courses make content available to all participants simultaneously on specific calendar dates.

This selection remains flexible, allowing you to transition between these delivery models at any point during course development.
Subsequently, assign a visual identifier and title for your educational space, select the appropriate organizational category, and establish participant access parameters. Upon completion, the system will direct you to the primary course management interface.
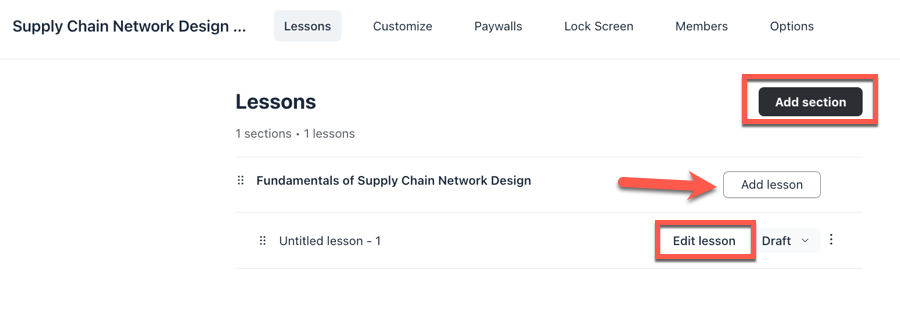
Proceed by selecting the Edit Lesson option located in the upper right portion of the screen, which will launch the curriculum development environment.
Within this interface, you can establish the structural framework of your course by adding sections and lessons to organize your educational content.

Initially, establish a section to categorize your educational content. Following this organizational step, you can generate individual lessons and access the content development interface by positioning your cursor over the lesson item and selecting the Edit function.
At this point, we’ll focus on populating our inaugural lesson with instructional content.
The lesson development environment consists of two primary components: the Featured Media container and the rich text editor.

After finalizing your lesson content, additional options become available through the left-side menu, including comment functionality activation, supplementary file attachment capabilities, video completion requirement settings, and automatic progression to subsequent lessons upon completion.
Select Save to preserve your work, then replicate this development process for all remaining instructional components.
At this stage, you may proceed directly to configuring access parameters and releasing your course. Alternatively, you can enhance your course with interactive elements. While these features aren’t implemented through simple toggle switches, incorporating them remains relatively uncomplicated.
To incorporate a discussion component within your educational offering, navigate to the space group containing your course, activate the menu by hovering over it, select the Plus sign, followed by Add Space. In the subsequent interface, designate Posts as your preferred space configuration.

Follow identical procedures to establish dedicated spaces for group discussions, participant listings, and scheduled activities. For expanded guidance on these procedures and additional functionality, consult our comprehensive Circle implementation guide.
Currently, your educational content remains in draft status, necessitating configuration of several parameters prior to publication.
Navigate to your course by selecting its title from the navigation panel on the left side, then activate the course settings by clicking the course name again from the page header.

This action reveals the complete configuration panel, providing access to appearance adjustments, revenue generation options, access restriction controls, and various additional settings.
Regarding monetization capabilities, Circle facilitates payment processing exclusively through Stripe integration, requiring connection of your Stripe account before implementing any payment barriers.
To establish this essential integration, navigate to Paywall → Connect with Stripe, then proceed through the guided setup process.
After completing the payment processor configuration, you can implement your initial revenue mechanism by accessing the paywall configuration section and selecting the New Paywall option.

Each paywall creation process effectively establishes a distinct pricing structure for your educational offerings.
The subsequent interface presents several configuration categories:
Beyond these primary configurations, additional customization options exist for post-transaction communication delivery and directing participants to confirmation pages following successful purchases.
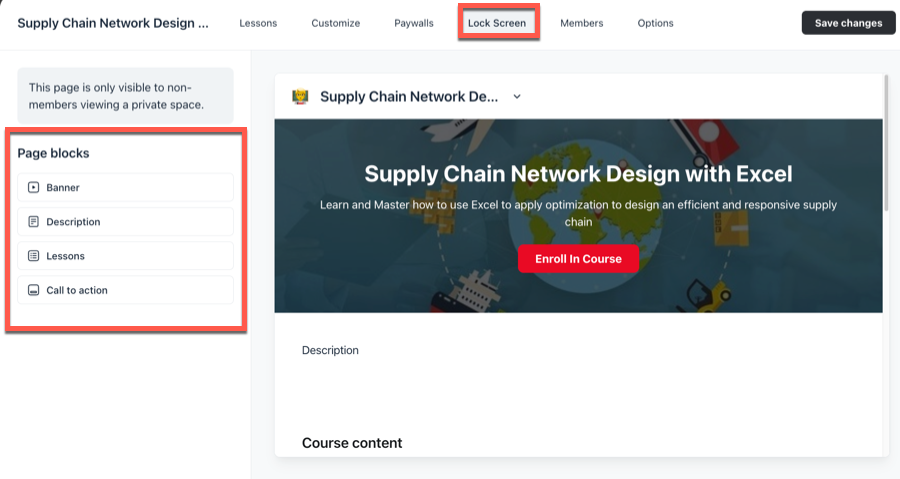
Next, let’s modify your Lock Screen interface, which displays to prospective participants who haven’t completed a purchase.
From within the course configuration panel, select Lock Screen to access the visual editor for this important conversion element.

This customizable interface incorporates these key components:
Each component offers extensive personalization options, allowing selective visibility control based on your marketing strategy.
With these configurations complete, your educational offering is prepared for distribution to your target audience.
For creative implementation inspiration regarding course development within this platform, review our comprehensive collection of exemplary Circle course implementations.
In conclusion, Circle.so Courses provides a versatile solution for integrating educational components within your digital community environment while enhancing participant engagement. The platform’s community-centered philosophy makes its educational framework particularly well-suited for collaborative learning experiences.
If you haven’t yet established a Circle platform account, initiate a 14-day complimentary evaluation period by selecting the activation button below.

Kaydence Tranter serves as the senior content writer at sellingonlinecoursesguide.com, where she crafts authoritative content that helps course creators build and scale their online education businesses. Her writing expertise helps transform complex course creation and marketing concepts into clear, actionable guidance for the platform's audience.

Kaydence Tranter serves as the senior content writer at sellingonlinecoursesguide.com, where she crafts authoritative content that helps course creators build and scale their online education businesses. Her writing expertise helps transform complex course creation and marketing concepts into clear, actionable guidance for the platform’s audience.

We respect your privacy and will never spam you.